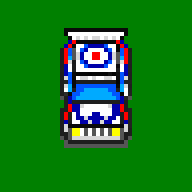
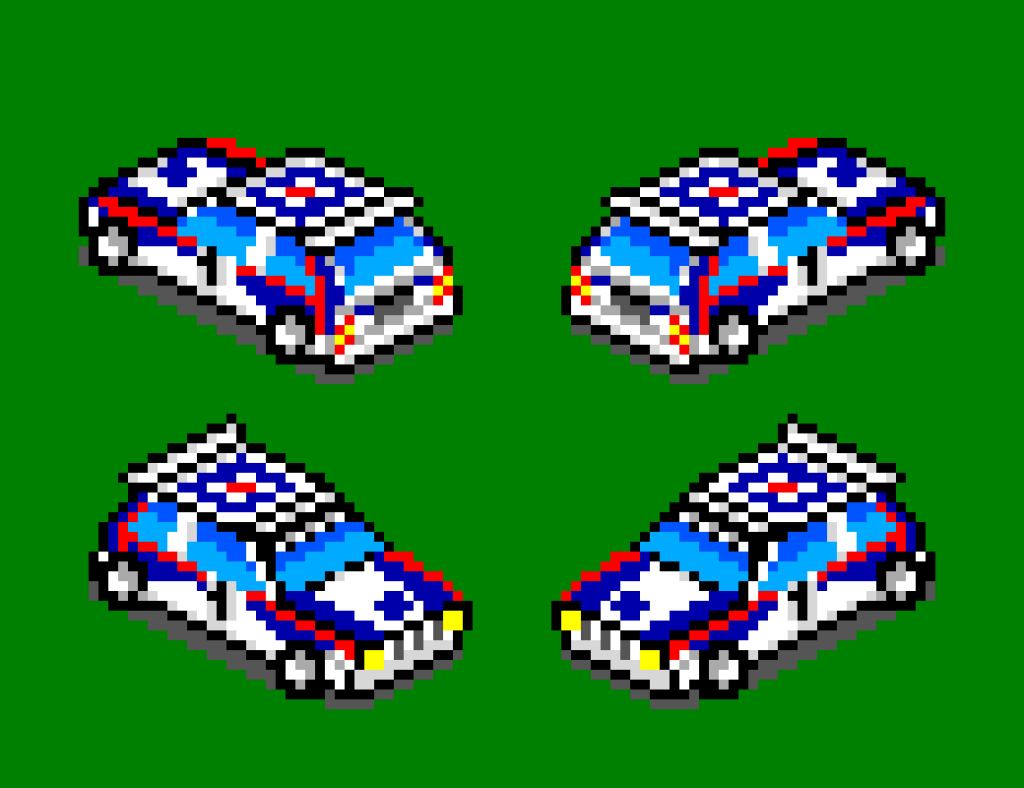
Finished drawing the basic sixteen directions for the car. I put them all together in a rotating animation and it… doesn’t look that great.
The car looks inconsistent from frame to frame which is wonderful. The car changes size and height. When I started was drawing the sprites by eyeballing them against the prerendered car but at the end I just started drawing overtop them.
But version 1 is done so now I can start working on code. But I think a version 2 will be in order once I get some gameplay going. Next time I’ll stick much closer to the prerendered version.
This article is part of a series exploring the reverse engineered inner workings of Downland, a game for the Tandy Color Computer, released in 1983, written by Michael Aichlmayr.
In the previous post I talked about how Downland’s 1-bit graphics are setup to take advantage of CRT artifacts to generate colors. In this article I talk about how Downland draws its sprites to the screen.
Sprite Hardware? What Sprite Hardware?
The Tandy Color Computer doesn’t have built-in sprite hardware like the Atari 400 or the Commodore 64, where the programmer can just set a few registers and sprites are conveniently placed on the screen. For the CoCo, drawing sprites requires directly manipulating the memory that is used for the screen.
Screen Memory
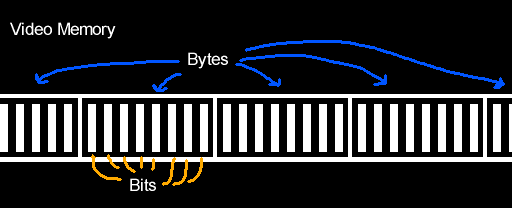
What the player sees as graphics is represented by a specific region in the CoCo’s RAM. Turning on bits in that region of memory will activate the corresponding pixels on the screen.
Writer’s Block
One problem with working with Downland’s 1-bit graphics is that you can’t directly address the bit/pixel you want to turn on. 8-bit CPUs like the Tandy Color Computer’s 6809 can only write to memory one byte (eight bits) at a time at the minimum. They can’t write individual bits. So for any changes you want to make to screen memory you have to do it in bytes.
Another limitation is you can’t write that byte anywhere. It has to be written along byte boundaries. This means you can only write a byte at every eight bits (0, 8, 16, etc). You can’t write a byte at bit 3 and expect it to change bits 3 to 10.
Sprite Basics
Because the screen is 1-bit, Downland’s sprites are naturally 1-bit as well, as seen on the player sprite below. Each frame of the player sprite is 16 pixels wide and 16 pixels tall. As the graphics are 1-bit, the 16 pixels for each row of the sprite take two bytes. The first byte of each row contains the front of the player sprite while the second byte contains the back.
8-Bit Drawing Limitations
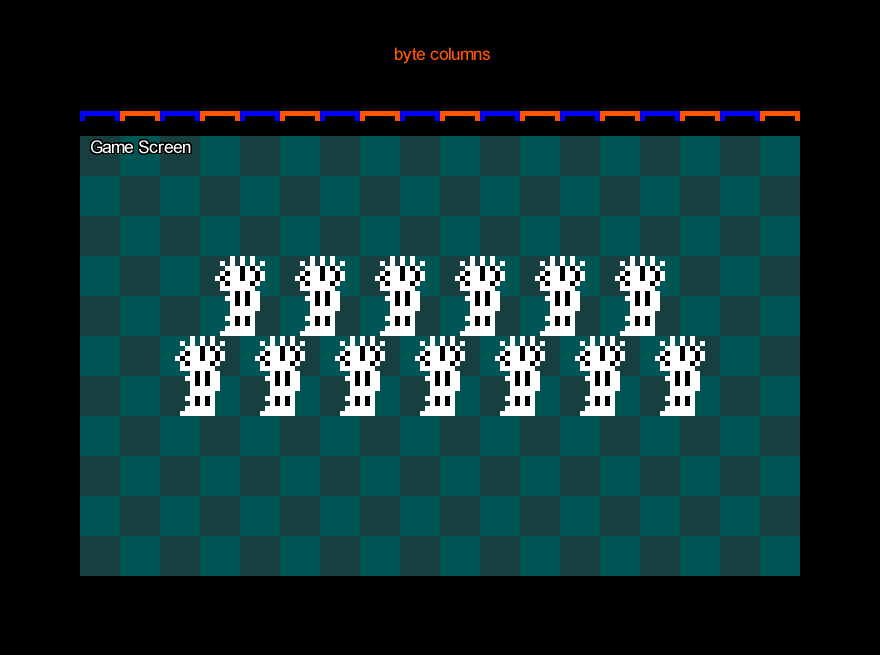
Because the CPU can only write 8 bits at a time, if you wanted to draw the sprite as-is to the screen you could only do it on byte boundaries. The result is the sprites appear at every 8th pixel on the screen horizontally.
Note that the sprite can be placed anywhere vertically. There’s no limit there.
Still, this is obviously very limiting for a platforming game like Downland which has objects going across the screen.
Shifted Sprites
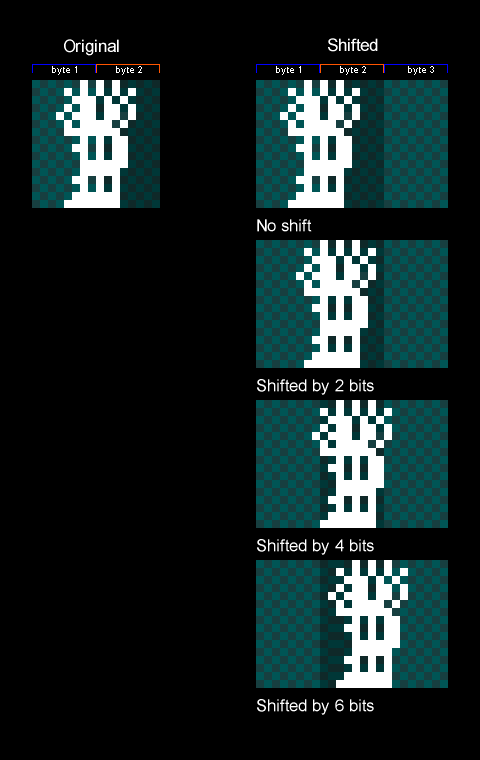
The trick Downland uses to draw sprites along the horizontal axis is by copying the original sprite and creating new versions that are shifted to the right by a certain number of bits. These are called shifted sprites or bit-shifted sprites.
Things to note:
In the game the sprites are shifted by two bits (aka pixels) instead of one because while the screen resolution is 256 pixels across, the game logic is actually half at 128. So for every X position in the game’s coordinate system, objects are drawn at twice that. Therefore it only needs shifted sprites for even-numbered positions.
It also shifts by two bits to maintain the CRT artifacting effect.
Because we only need shifted sprites for the even positions along the byte, only four shifted sprites are needed for each sprite.
Shifted sprites go past the second byte so they now need take up three bytes for every row.
There’s no version of the sprite for being shifted by 8 bits or more because at that moment you can just use the first shifted sprite again. It wraps around.
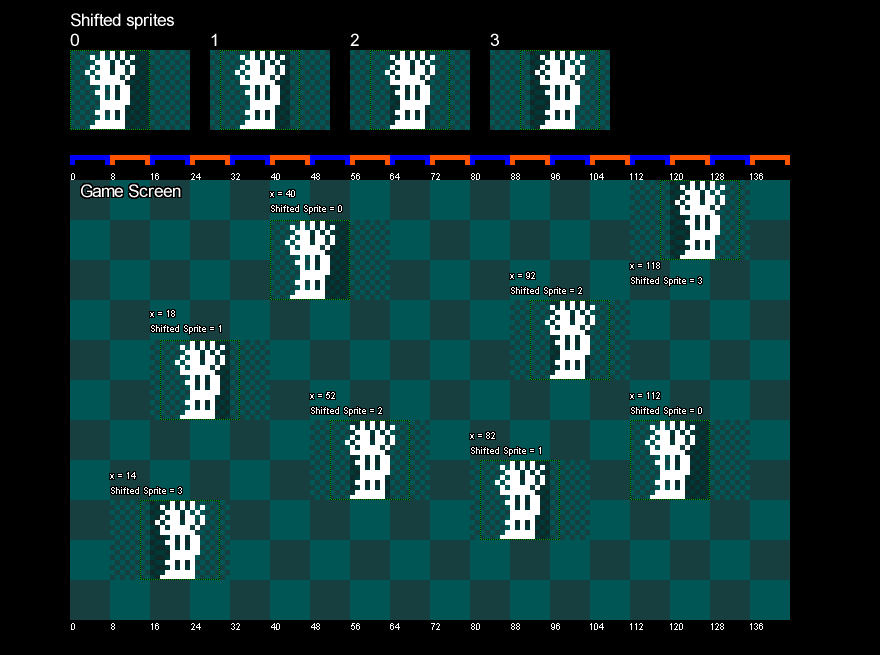
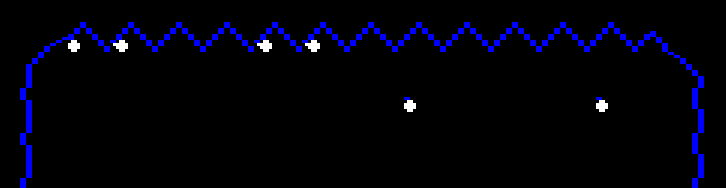
Drawing Shifted Sprites
The game uses the sprite’s X position to determine which shifted sprite to draw. The game takes the lower two bits of the object’s X position, which gives a value that goes from 0 to 3. It uses that value to look up which shifted sprite to draw. Zero uses the first shifted sprite, 1 uses the second, 2 uses the third, and 3 uses the fourth.
The image below shows bit shifted sprites being drawn on screen with different X values.
Memory Usage
Shifted sprites are generated when the game is turned on and are stored in memory.
As there are four shifted versions of every sprite of every object, it can take up a fair bit of memory. For example, the player’s ten frames of animation take up:
10 frames x 4 shifted versions x 3 bytes per row x 16 rows: 1920 bytes
With the game taking 6k bytes for the screen, and another 6k for a clean version of the background, it really starts to impact the 16k of the original Tandy Color Computer. But everything fits.
Which Sprites?
Shifted sprites are generated for the player, the ball, and the bird sprites. The ball and bird sprites each have two frames of animation.
Exceptions
The drops, the splat sprite, and the door have their own particularities when it comes to drawing them shifted.
The drops are actually pre-shifted in the ROM, as seen here:
Side thought: I wonder if the drops were the sprites Mr. Aichlmayr made first and then immediately realized that storing shifted versions of all the other game objects was going to take a lot of ROM space and changed strategy. Or the change in strategy came at the end of development trying to reduce the game’s final ROM size.
For the splat sprite, it’s the only one in the game that’s 24 pixels wide.
Unlike the other sprites above, where the shifted versions are pre-drawn, drawing the shifted splat sprite is done on the fly. When the player gets squashed the splat sprite is drawn shifted into a temporary offscreen buffer. The buffer is 32 bits (4 bytes) wide so that the shifted sprite can fit. Then the offscreen buffer containing the shifted splat sprite is drawn to the screen.
Fun fact: the splat has a two frame animation when the player dies but there’s no second frame stored anywhere in rom. To achieve the animation, the splat sprite is first drawn to the screen and some time later the top part is erased directly from the screen’s memory.
The door is also drawn on the fly, using the same technique as the splat sprite.
It’s drawn when a door gets activated and also as part of the background drawing when the player enters a chamber.
Pickups
Finally, the game treasures (key, diamond, money bag) are the simplest drawn objects in the game. They don’t use shifted sprites at all as they’re always drawn at a multiple of 8 pixels.
Wrapping Up
Lacking dedicated hardware support, shifted sprites is a commonly used technique for Tandy Color Computer games to draw objects on the screen. It lets sprites to be placed anywhere on the horizontal axis at the expense of memory. Downland uses the technique in various ways to draw its game objects. In the next article, I’ll talk about how the background graphics are drawn.
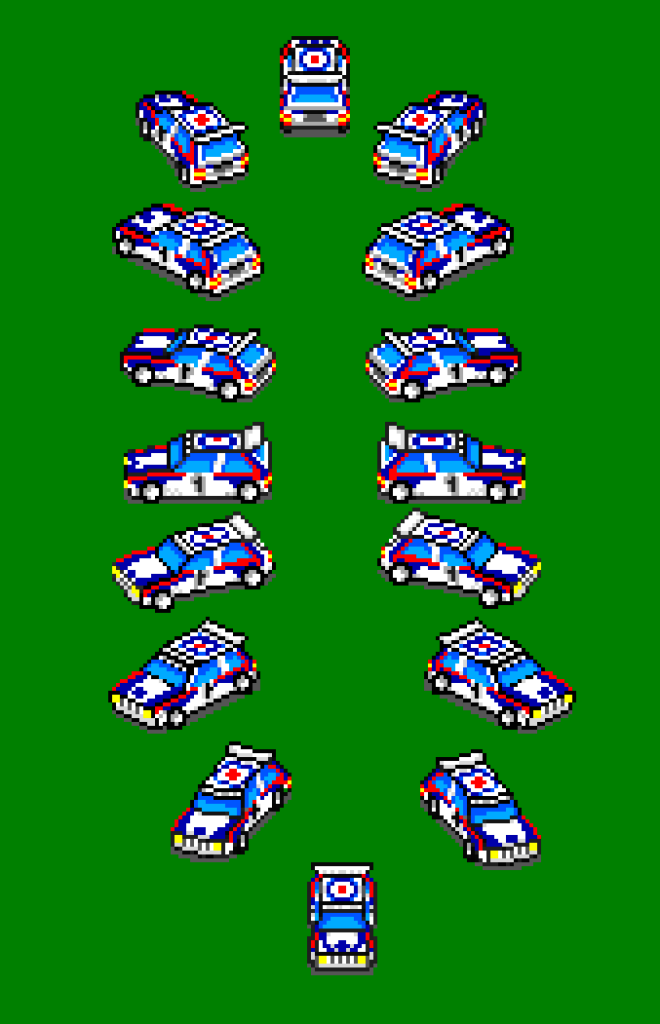
Not a big update. Created more graphics in Graphics Gale for the different directions of the main car sprite. Ten down, six to go. It’s slow going because the work is tedious and I’m lazy, but I’m starting to get more confidence in the car sprite making process. Hopefully I’ll have all sixteen directions done this week.
The fun (read: not fun) thing about the Sega Master System is that it doesn’t have sprite mirroring like the NES does. So the game will need graphics for all sixteen directions. It does mean that I can make the graphics unique for all angles, though. So I can keep the #1 on the car door facing the right way.
This article is part of a series exploring the reverse engineered inner workings of Downland, a game for the Tandy Color Computer, released in 1983, written by Michael Aichlmayr.
If you look at the game’s video memory, internally Downland is actually a 1 bit game. The graphics are effectively black and white.
But the game actually has color. How does that work? Notice the spacing between the pixels on the floor and the diamond. The game draws its graphics in such a way to take advantage of CRT artifacting effects. These effects helps the game simulate a limited set of colors. This was a common technique used at the time, as seen on other computers like the Apple II.
Colors
Because of how the NTSC television signal works, different pixel patterns determine which color will be displayed and how it blends with other colors.
On the CoCo’s 256×192 graphics mode, each pixel is represented by a single bit. The artifacting in this mode interprets pairs of bits like so:
00 will be black
01 will appear blue
10 will appear orange
11 will be white
A blue pixel next to an orange pixel (01 10) will also be white
The Tandy Color Computer also has a quirk where the blue and orange colors can be swapped when it powers on.
(To me, the blue version is the canonical version.)
The above is a very horribly simplified explanation of the Coco’s CRT artifacting. A much deeper dive on how all this works can be found in this great Coco Town YouTube video:
But in practical terms, the graphics mode effectively gives a 4 color 128×192 screen.
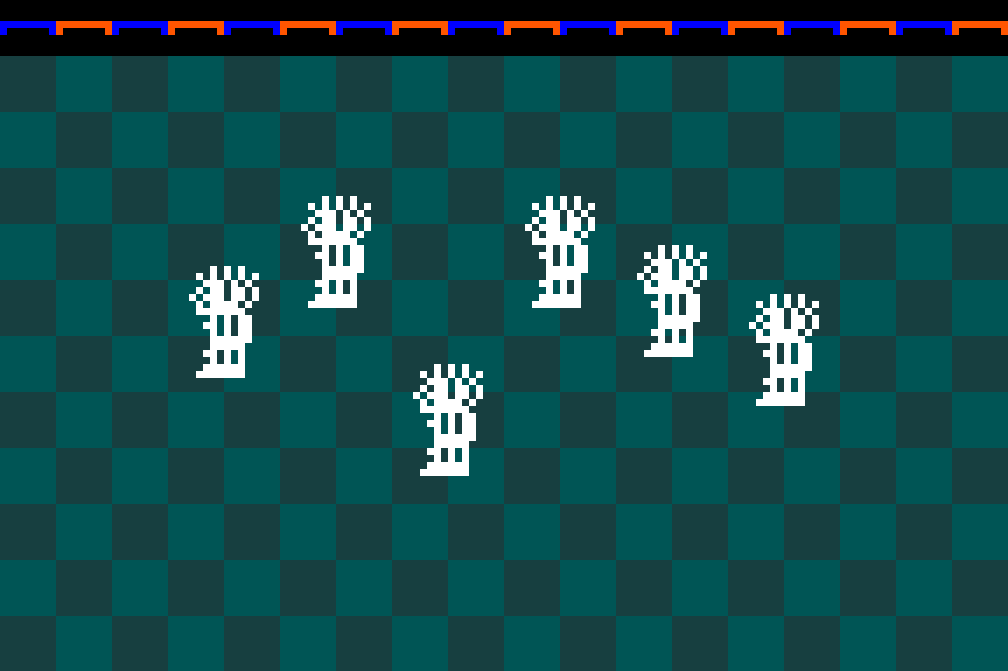
This “effective” resolution explains what I was saying about drop placement in the previous Downland Unearthed article. The game logic works at 128×192 while the graphics are drawn at twice the horizontal resolution. This counts for both the background and sprite drawing.
Another way of saying it is sprites need to move horizontally every two pixels, to maintain color stability when going across the screen. Otherwise the pixel colors would cycle like a (really limited) rainbow.
Here’s a capture of a hacked version of Downland_C simulating the player and the ball being placed every pixel instead of every two:
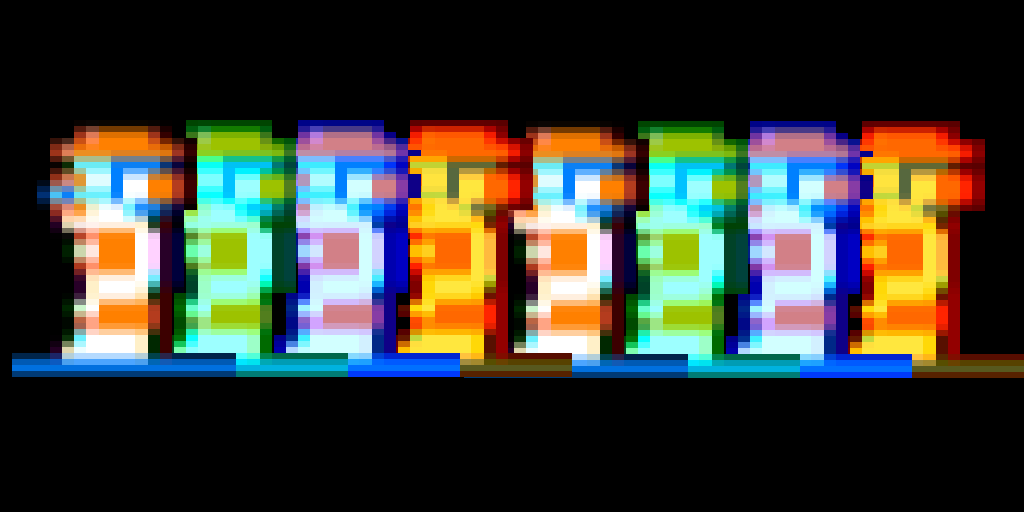
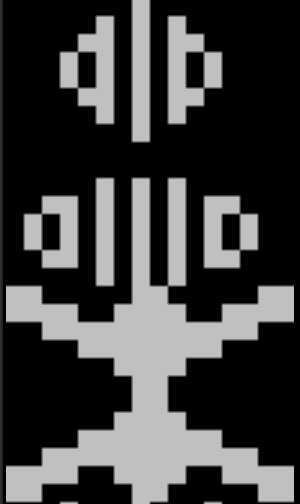
One-Bit Shapes
What I find interesting is the way the sprites have been drawn to take advantage of the CRT artifact effect. Here’s are side-by-side comparisons of the 1-bit graphics and the color graphics. The color versions were produced using the XRoar emulator in the the 5-bit LUT Composite rendering mode.
If you stare at the player sprite too long, you start to notice that he’s got blue AND orange hair and you can’t tell what the orange and blue parts of his face are supposed to be. Is that a blue eye at the lower half of his face? He has identically sized mustache and eyebrows? Also, he has ridiculously long arms and his shirt either has a single button or he’s just showing off his nipples. It’s hard to tell as this resolution. And who knows what the white pixel under his hand is supposed to represent!
Without color, Downland’s iconic bouncing enemy of doom is finally revealed to be just a killer walnut.
For a diamond, it’s drawn pretty plain, isn’t it? Still, this orange upside-down triangle gives 400 points! (more or less…)
M is for money, obviously. I like how the stray pixels add a kind of fringe around the top of the money bag.
Dithering makes straight lines? *mind blown*
I never know what the shapes on the doors are supposed to represent. A porthole and a wheel? Are they actually doors from a submarine? Is Downland actually set underwater?
Rom Storage
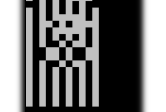
All the sprites in the game are stored with these patterns, as seen here using a raw pixel viewer to look at the rom’s contents:
(Notice how some of the sprites like standing left and right are perfectly mirrored but some, like the jump, aren’t.)
The one exception to this is the game’s font. It’s stored without effects. I couldn’t get the viewer to align the characters perfectly, but you can see that they’re made up of solid pixels.
Each character is 8 bits wide and 7 rows tall. The character drawing function draws each row while applying (and’ing) a bitmask (01010101) on top to turn off every other bit. This causes the character to appear blue.
I wonder why the mask wasn’t pre-applied. The game could’ve saved a few cycles when updating the timer and score to the screen. Maybe the author wanted to keep the font pristine for easy edits, not minding the performance hit. Or maybe he started with white text and then changed his mind.
Half The Battle
So that’s how Downland takes advantage of CRT artifacts to generate its graphics. One obvious unanswered question is how the graphics are actually drawn on screen. The graphics are 1-bit per pixel but writing to memory is done eight bits at a time as a byte. I hope to explain how Downland draws it sprites in the future.
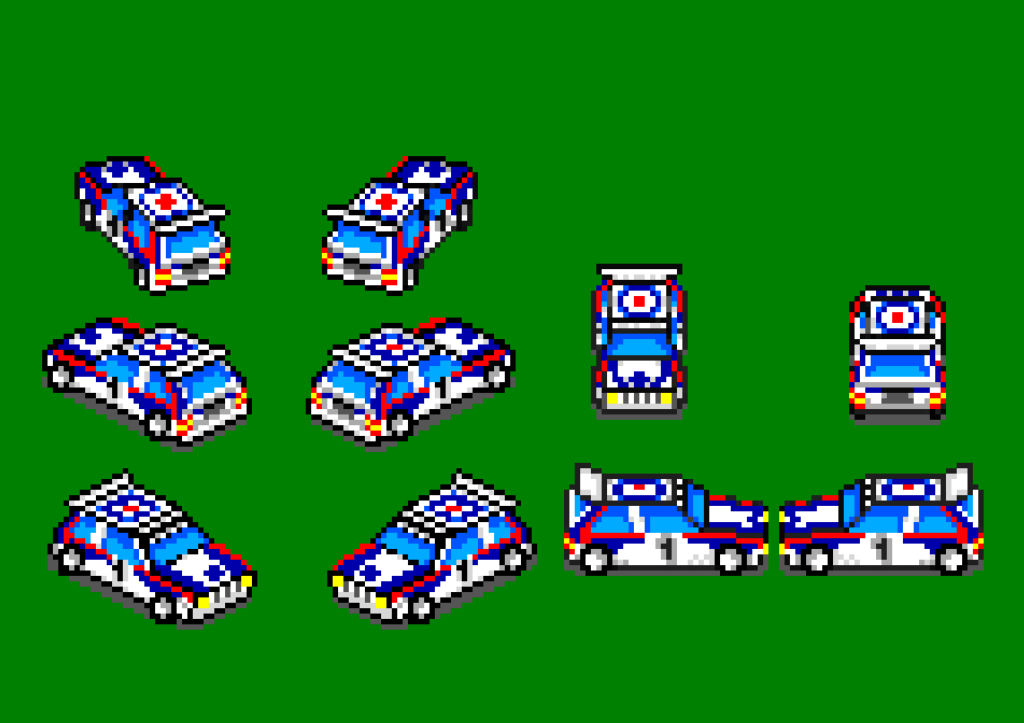
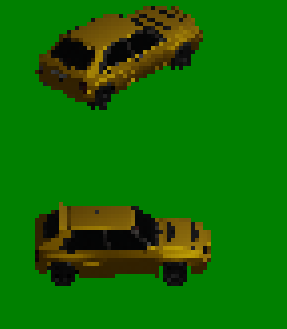
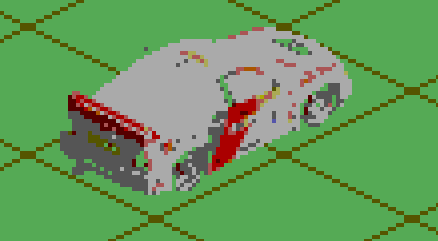
Actual progress today. This time I used the render of the rally car as a base to get the correct proportions when drawing the sprites by hand.
After working out the general shape I then worked on getting a decent paint job / livery on it. At this resolution it doesn’t look too bad.
It took me all day to get two angles done. I want 16 directions. Doing the up/down/left/right angles won’t be too bad as they’re flat but the in-between angles will probably kill me. It’s hard to get the sprites looking consistent in different angles.
In progress shots:
No AI here! All hand drawn pixels lovingly painted.
Today was my second attempt at trying to figure out a way to help create isometric sprites that can go in 360 degrees. After yesterday’s lack of success, I thought I’d just create the sprites by hand using images as reference. I couldn’t decide what type of rally car to go with so I went with the Lancia Delta because it’s pretty boxy. Boxy obviously meant it was going to be easier. But as you can see from my test attempts it wasn’t working. I couldn’t get the shaping right just doing it by eye. The spoiler wasn’t done too badly, though!
I was using the Enduro Racer bike sprite to get a feel of what the size of the sprite should be. Last night’s test cars were way too big. I think a sprite that’s six sprites across should be fine for all angles, and it leaves me room for effects sprites like dust and exhaust flames. I’d use a sprite flicker strategy to keep the car always visible.
With the manual method obviously not working I went back to using a 3D model but this time with the intention of using it as a base, not as the final result. I found this model of a Delta and took test isometric screenshots. Next time I’ll be drawing over it while hopefully keeping the shape correct.
Today was cleaning up the GSLib example code to remove the bits I didn’t need and to make the camera handling and sprite drawing more streamlined. Also added the background asset generation for GSLib as part of the build process.
But the big thing was experimenting with Blender to make pre-renderedisometric (actually dimetric) sprites. It’s been a while since I’ve used Blender and I have to admit I’ve never really liked using it. But hey, it’s free. I downloaded the latest version and setup a basic orthogonal camera and messed with its settings until the rendered shapes fit the tileset I drew.
I first rendered a cube and then a rectangular prism. The top of the rendered shapes fit the background tiles perfectly but the bottom didn’t, which was annoying.
But it was good enough. I figure I’ll have to manually fix things anyway. As long as I get a guideline.
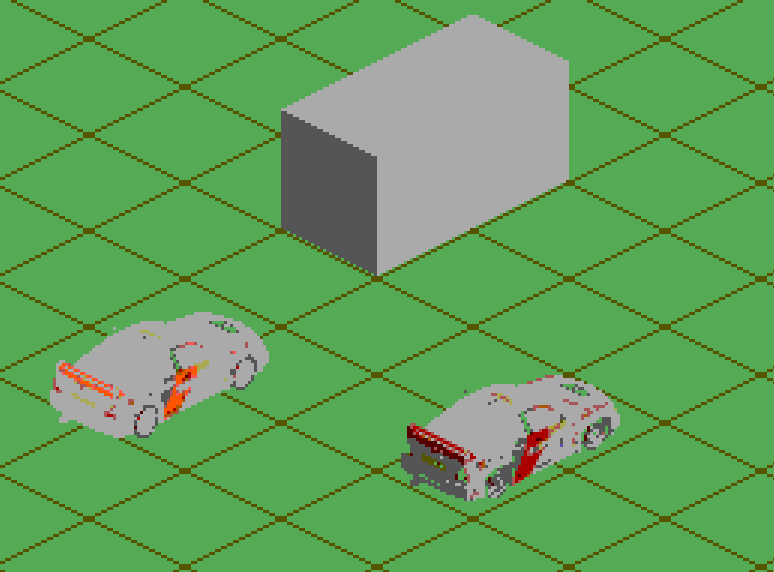
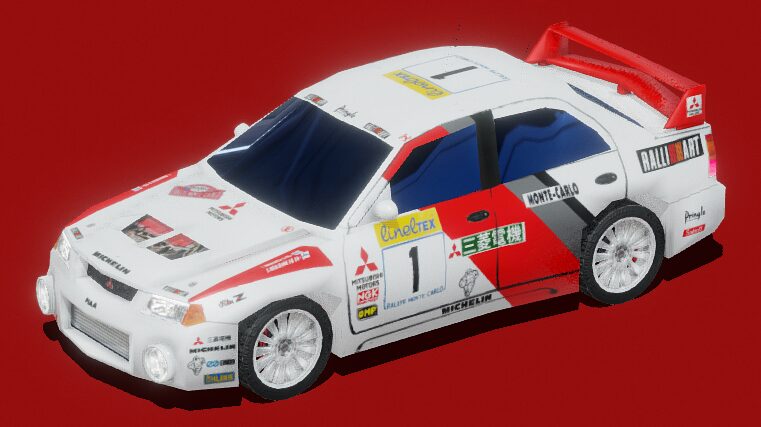
The next step was to get an actual 3d model of something. I am not a 3D artist so I got nice nice rally car from SketchFab.
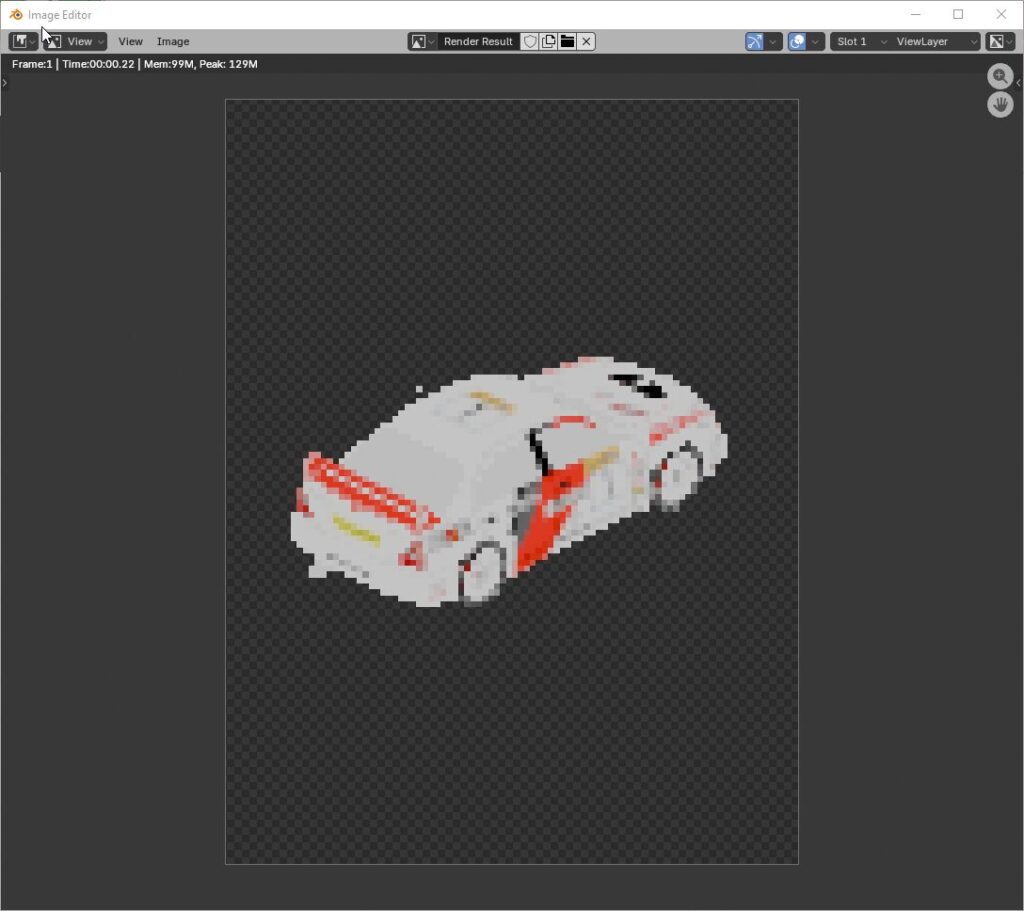
I rendered it in my test scene and got a reminder that I’m not a lighting artist either.
The colors came out super flat and it wasn’t any better when I imported it into a Graphics Gale imagine using the Sega Master System palette.
Yeah, I don’t think this is gonna work. I want vibrant colors and sharp lines. Pre-rendered graphics are too muddy and will require too much work from me. But maybe I be able to use it as a guide to draw overtop.
Only had a bit of time tonight (after updating the latest Downland article a million times) but I figured out why the player wasn’t moving around. There’s a metatilesMetaLUT table in the code that determines whether a given 16×16 pixel metatile is walkable or not. The table didn’t match the new background’s set of metatiles so I just changed all the entries in the table from 0 to 1 and now the player can go anywhere on the map.
This article is part of a series exploring the reverse engineered inner workings of Downland, a game for the Tandy Color Computer, released in 1983, written by Michael Aichlmayr.
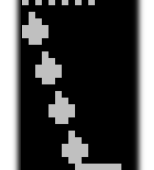
Acid drops. If you die in Downland, chances are it’s because of one of these falling bastards.
Never mind the ball with its repetitive and predictable path across the screen. These white liquid drops of death are random, fast, and relentless.
Drop in a Bucket Chamber
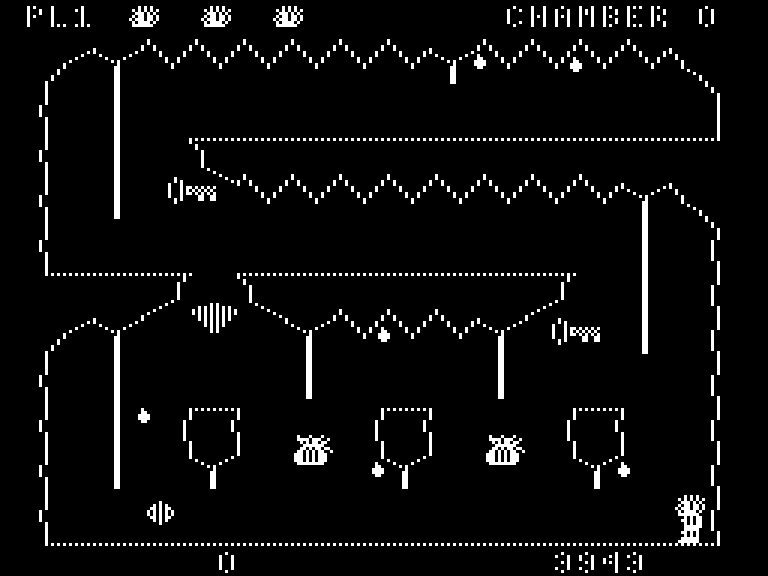
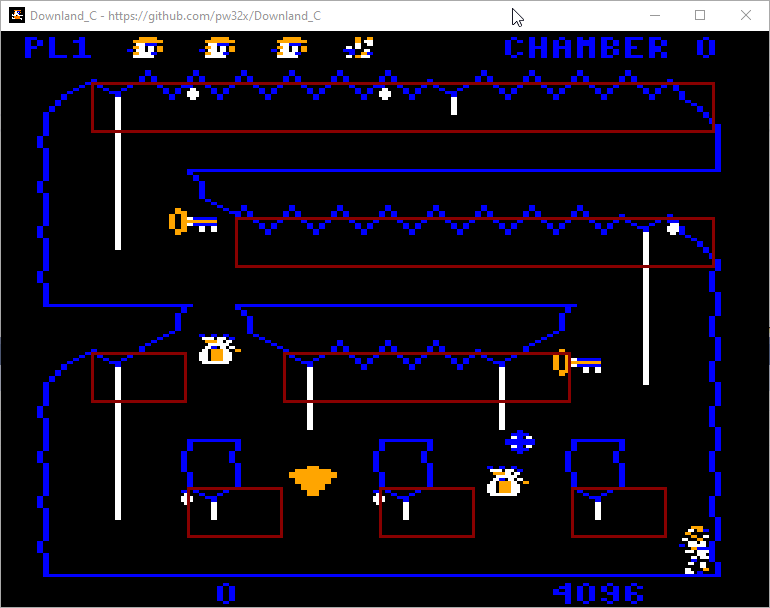
For each chamber, the game data defines a number of drop spawn areas. Each drop spawn area is defined by an X and Y position, plus the number of drop points it has across the area. In the first chamber seen in the image below, there are seven drop spawn areas (boxes in red):
The first drop spawn area has thirteen points across it to spawn points from (marked in green).
A curious note is that in the game data the number of spawn areas and the number of drops to spawn per area is one less than it should be. So for the first chamber, the number of spawn areas is stored as 6 (not 7) and the number of drops in the first spawn area is stored as 12 (not 13). I don’t know what the advantage of this would be, if any.
Placing Drops
Some important background: The game’s world size is 128 by 192 points. The horizontal coordinate system goes from 0 to 127. The graphics mode that the game uses is PMODE4, which is 256 by 192 pixels. That means a point on the horizontal axis corresponds to two pixels on screen. Placing an object at the horizontal position 64 means they’ll appear at pixel 128 in the middle of the screen.
When the game wants to spawn a drop, it first picks randomly a drop spawn area. Then it picks a number between 0 and the number of drop points for that area. The drop is given a location that is starts from the drop spawn area’s XY position and then offset to the right by the the drop point chosen multiplied by eight.
That’s generally the way it works, but there are two exceptions.
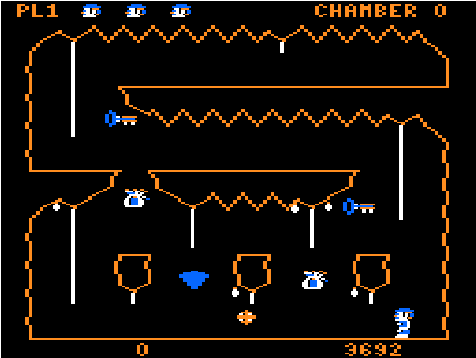
The first exception is about giving room to the player. Look at the left side of the top most drop spawn area in the image above. Notice that the drop is actually offset to the left of the box where its supposed to spawn?
Enhance!
That’s because the game tries to detect whether there’s a rope nearby. It checks four points to the right and six points down. If a rope is detected, the drop is offset to the left. This gives enough room around the rope to let the player climb up without being burned to death.
The second exception is about removing that room from the player and increasing the chances of them climbing up and getting burned to death. What Downland giveth, Downland taketh away. But why?
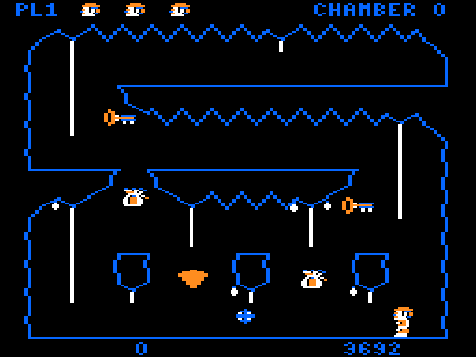
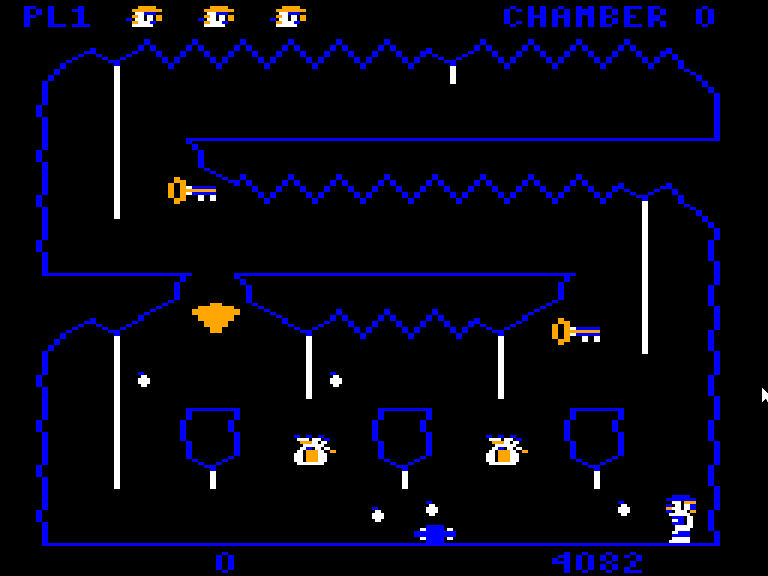
In the drop spawning code there is a part that says that if ever the player has completed the game three times in a row (which we must all admit is some kind of superhuman feat) the X position of the drop is made even. As the positions of the drop spawn areas are on odd positions, it effectively moves all the drops one position to the left, which corresponds to two pixels in that direction. In the image below, the small bright red boxes are the ones that have been affected by that rule.
This makes it so that the drops on the right side of the vine will always touch and kill the player, forcing them do perform rope acrobatics when climbing. This makes the game pretty much impossible to play, because drops fall on both sides of the rope simultaneously very often. Well, maybe it’s not impossible but the chances are definitely not in your favor if ever you manage to get to that point.
Wiggle, Wiggle, Wiggle
When a drop is finally placed and spawned, it hangs on the ceiling for 40 frames. As it does so, the game flips its vertical speed up and down every frame so that it wiggles. There were rumors that the wiggle time was random, but it’s not. Because of how drops can be spawned over other drops it might give an effect that it’s wiggling longer.
Gravity? What Gravity?
Drops fall at a steady rate. They go down two points per every update (but not every frame! see below). No fancy physicscalculations here!
Yeah, But… How Many?
The maximum number of active drops is ten. But the actual number of drops spawned depends on the chamber number and whether you’ve completed the game at least once.
The rules that determines the number of active drops in a chamber are:
If the chamber number is 5 or less, then the maximum number of drops is 6.
If the chamber number is greater than 5, then the maximum number of drops is chamber number plus one.
After completing the game once, the maximum number of ten drops is used for all chambers.
The maximum number of drops is also used for the title screen and the “get ready” screen. On those screens, the game lies to the drops system that the game has been completed so that it spawns all the drops. Also on those screens the game doesn’t actually wait for vblank so it just draws the drops as fast as possible.
Half The Work In Half The Time
Not all the drops are updated on every frame. The drops system only updates five drops at a time, alternating between the odd numbered and even numbered drops. This partial update means there’s more time left over for other parts of the game’s logic to be processed.
Waitaminute, You Forgot a Section!
So that’s the drops system in a nutshell. What I haven’t talked about is how the game handles the drop collisions with terrain and with the player. And also the drawing routines. I want to cover those topics more in-depth in later posts.
Today I used GSLib’s UGT to export a new background and integrated it into my project. Baby steps!
At first UGT couldn’t run. The version of the tool packed in the original GSLib release uses JavaFX, which isn’t included in recent releases of Java. Fortunately there’s a fixed version by thatawesomeguy on smspower that uses Java Swing. Its GitHub page is found here. It worked out of the box and that’s the version I’m using. It also has a handy export all feature so you don’t have to export all the parts manually.
After I got that settled, I generated a large map, exported binary data from the tool, converted the data to banks and imported it into the project. When I ran it the first time I thought it wasn’t working correctly.
But it turns out I was trying to draw an area outside of the map I made. Whoops! The original demo map was 1024 x 1024 pixels and my test was about a quarter of the size. The game was originally configured to start from the bottom right corner and the new map didn’t have any data in that area. So it was using random yet repeating data from somewhere.
Now that I got that to work, I should try a bigger map! Let me try that right quick.
[…time passes…]
Does it work? The answer is… maybe. I tried a 2048 x 1152 map. The UGT export worked fine but converting to binary with devkitsms‘ assets2banks.exe tool gave me multiple banks of 16k data and I wasn’t ready to start messing around with managing multiple banks yet. Created a 1088 x 1152 map which fit into one bank and that ran successfully.
“Successfully” in the sense that yes the game ran, but it doesn’t actually scroll yet. The new map data doesn’t have the terrain collision setup for the player to walk on. Right now, everything is a solid impassible block.
Fixing that will be for next time.
Ps: You know, I think what’s likely is that the maximum size of the map is whatever that can fit into a 16k bank.


