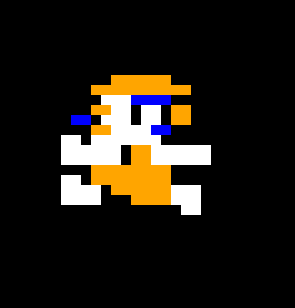
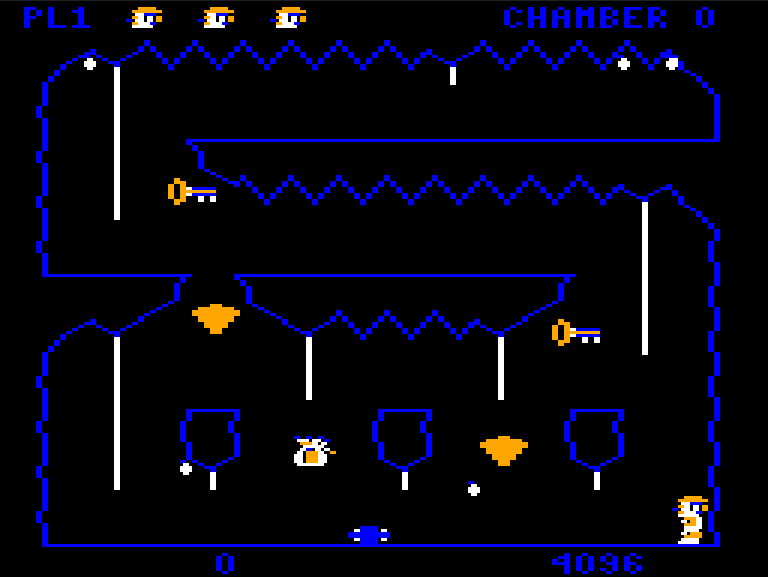
This article is part of a series exploring the reverse engineered inner workings of Downland, a game for the Tandy Color Computer, released in 1983, written by Michael Aichlmayr.
As my last Downland Unearthed article, I want to talk about the journey I went through to bring the game to over a dozen different consoles. Buckle up, it’s gonna be a long one.
But Why Though?
You could say one of the reasons for going through this whole reverse-engineer-and-port process was to get people from all the world to play this great game. But in truth I just wanted to get Downland on a platform with actual good controllers. Never again will I have to suffer using those godawful, loose, non-centering Radio Shack joysticks.

Oh sure, I could say it’s about game preservation and community, and all those good things, but really it’s those fucking joysticks.
Okay, maybe it’s a little about game preservation and community. A tiny bit. A smidgeon. A tad.
I digress.
When I started looking into Downland as a project, I was surprised no one had reverse engineered the game before. It’s one of the most classic and beloved CoCo games. If nobody had done it I thought maybe I could take a shot. There didn’t seem to be a lot of competition.
Ghidra To The Rescue
I’m not an assembly language programmer and can’t write any real program in it to save my life. But I’m a programmer with retro console experience, so I was confident enough I could muddle my way through.
So over the years I had made several attempts but never really got very far. I was using MAME’s debugger and I found its toolset too limiting and too cumbersome. It was hard to get the sense of the whole scope of the game, to browse the assembly, and to document how it worked. This time I decided to try Ghidra and that turned out to be a pretty good idea. I had never used it before but once I got the hang of it I managed to delve deeper and quicker into the game’s internals than I had ever done before. After so many attempts I had finally found a good foothold.
Timeline
I started disassembling the game in November 2024. I was using Ghidra to map out and document the code and the trs80gp emulator‘s debugging features to verify my findings. Around mid-January 2025 a large portion of the code was figured out. At that point, I had a code listing that, when converted to a LWTOOLS-compatible format, could compile to a byte-for-byte replica of the original V1.1 version of the game.
You can find the listing here.
Currently, the code hasn’t been 100% deciphered. But all the important gameplay code and data structures are, which was enough to start converting everything into a higher level language.
With that done, the first goal had been achieved!
Unearthed Discoveries
On the way to that milestone, I made some really neat discoveries:
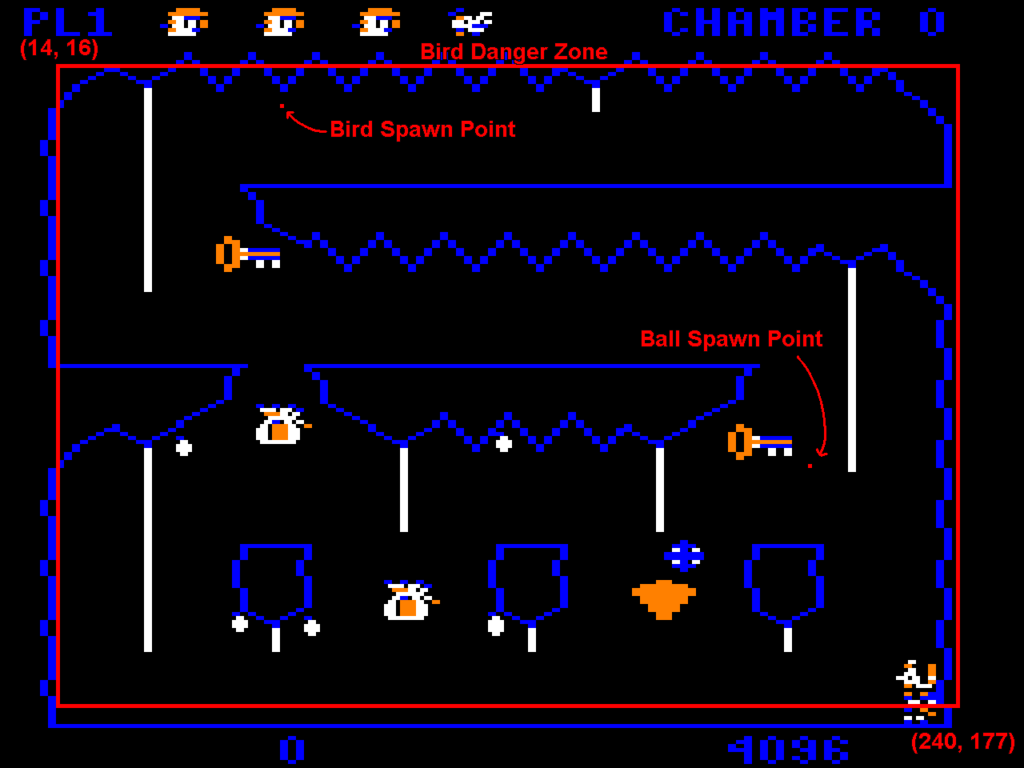
- Knowing once and for all how the drops are affected and displaced by player progress.
- Confirming that drops wiggle consistently for 40 frames before falling. There had been rumors that this was random.
- Evidence of possible cut content from the list of rooms that contain the ball-boulder.
- How the horizontal climbing worked
And had solved the mysteries of:
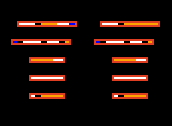
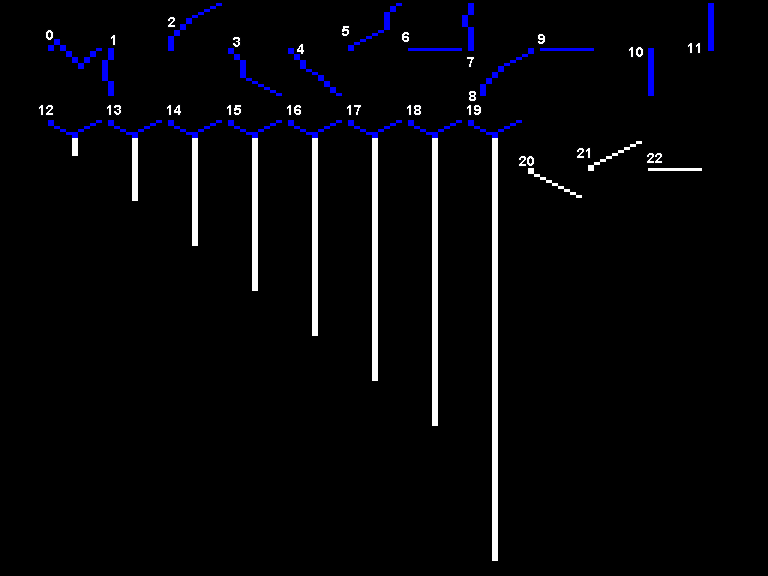
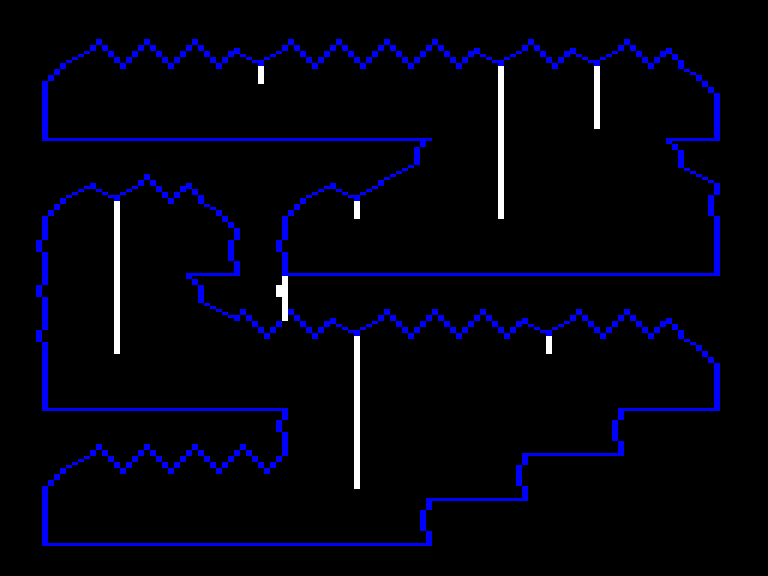
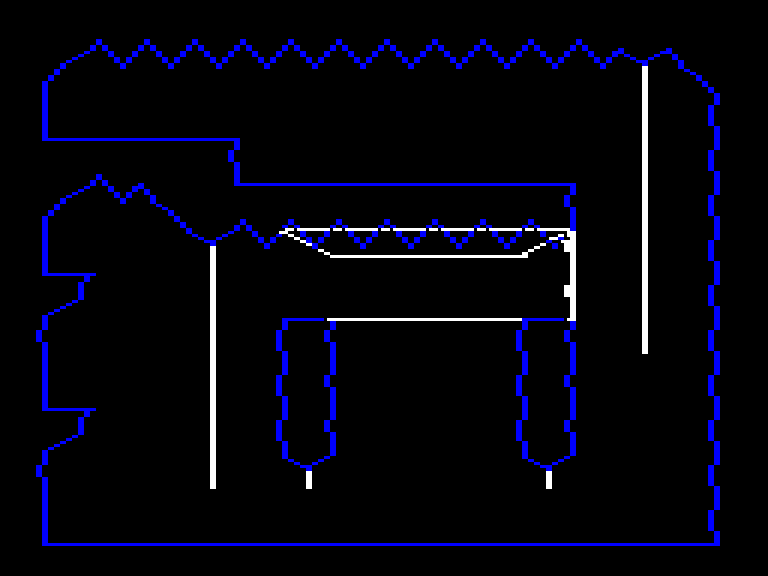
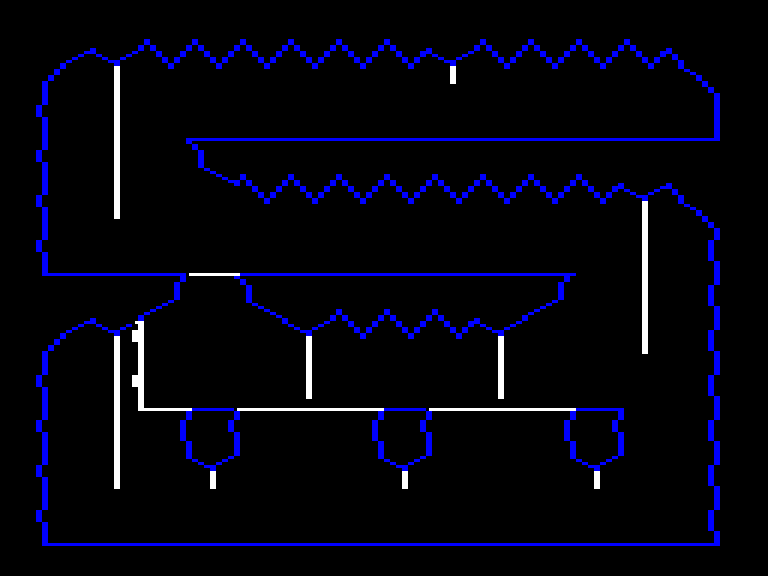
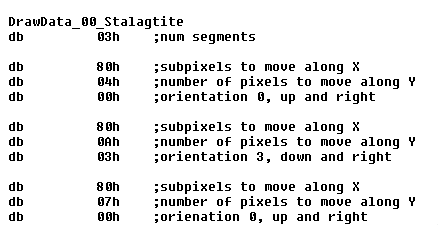
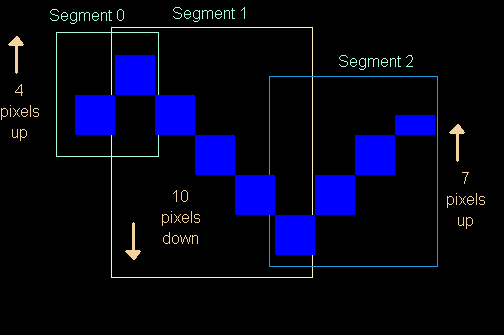
- How the background drawing worked. (No tiles! A simulated plotter!)
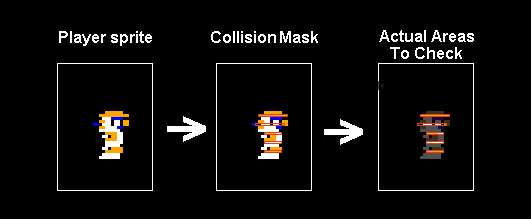
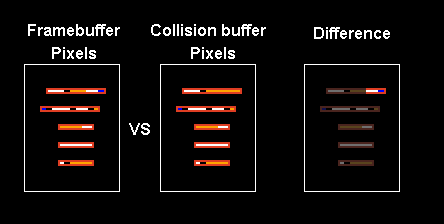
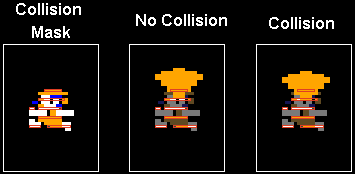
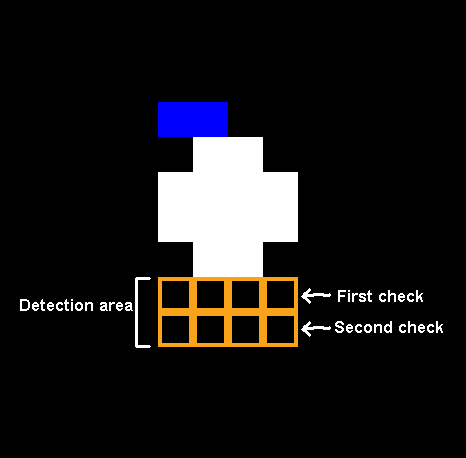
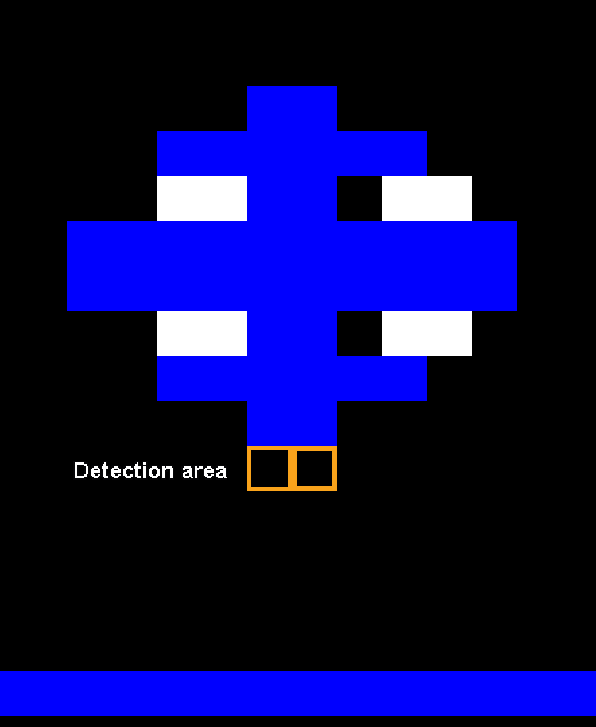
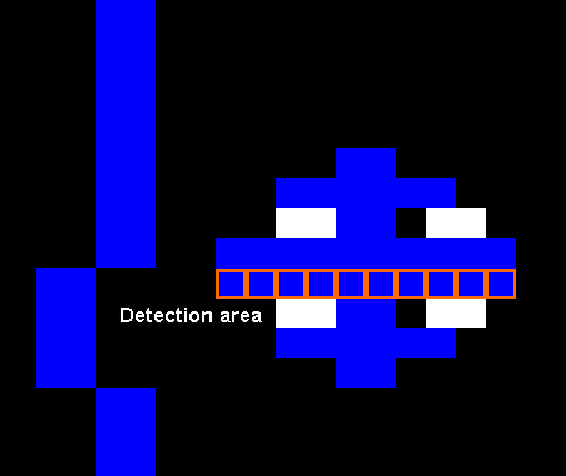
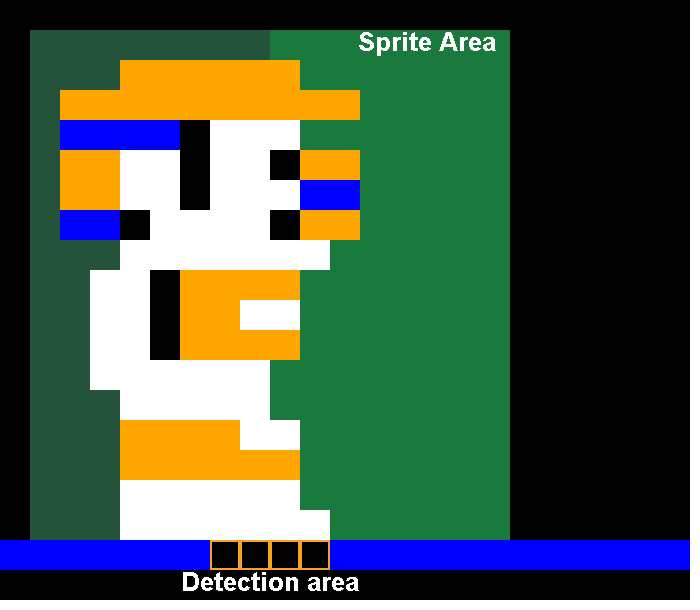
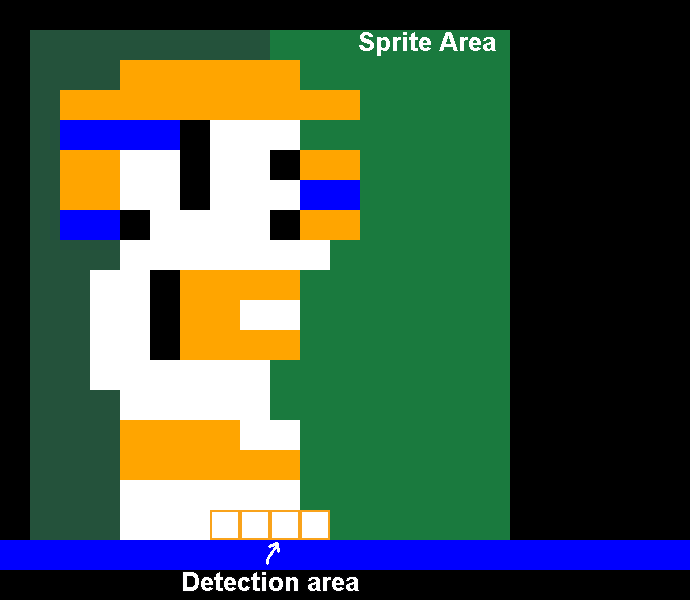
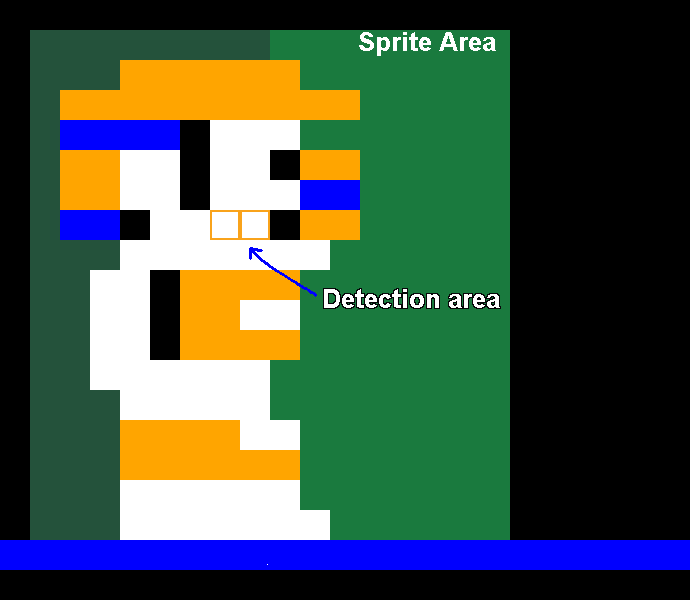
- How the terrain collisions worked (No tiles! Per pixel!)
Converting To C
The next step was of course to convert the assembly to a higher level language. There was really no question which one. I needed it to be portable and available on the largest range of devices possible. The C programming language was the only choice.
(But you know, a brainfuck port is always possible)
I started on the C version in late January. My hope was to be able to replicate the original gameplay and its finer details, and to prove that my understanding of the assembly was correct.
Naturally the main challenge was getting the game object behaviors right. There aren’t very many types of objects in the game, but any perceptible difference would break the distinct feel of the game.
Getting the Details Right
Even with the assembly code in front of me, it still took a lot of effort to verify that the C version worked identically.
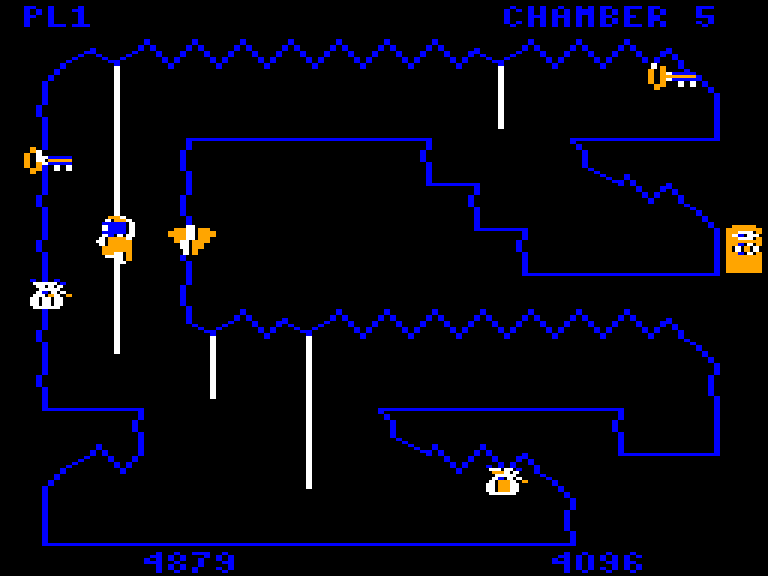
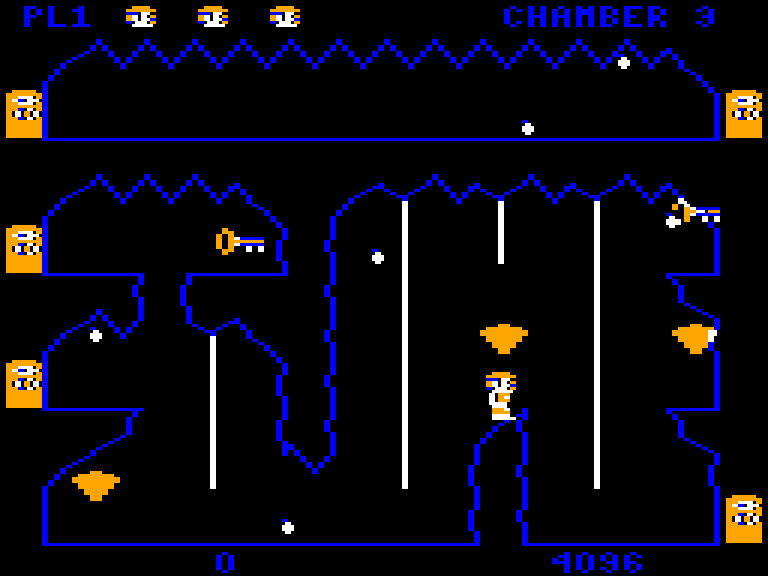
For example, it took me an entire week to get the ball bounce physics to work exactly like the original. I got to the point where I mapped its trajectory frame by frame, comparing the game’s internal values in emulator with the C port, fixing off by one errors until I got it right. Reproducing the physics exactly was crucial for gameplay. Without it, you wouldn’t be able to hide beneath the ball-boulder in chamber 2.

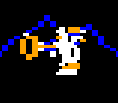
The player physics was even more important to get right. The jump is one of Downland’s most unique characteristics. It’s smooth and floaty yet still has a heft to it.
The player can also bounce off walls and can jump on ledges pixel-perfectly. Not being to replicate that means that there are sections of chambers that are basically impossible to traverse.
This was a much greater challenge than the ball-boulder physics. I didn’t get it 100% right. I think maybe it’s about 98% correct. There are slight differences with the wall bounce where jumping straight into a corner behaves not quite identically. But in practice it’s really close.
The First Port (PC is the Choice For Me!)
The first platform that got a C version of was Windows. Windows is evil of course but it’s what I’m most familiar with. I wasn’t ready to start with a Linux or MacOS port as then I’d be struggling with two problems instead of one.
I developed using Visual Studio 2022. I used SDL3 for the graphics, controls, and sound. To be honest I don’t actually remember why I didn’t use SDL2. Knowing how lazy I am, I don’t think I would’ve immediately gone for the newer, less established API with fewer supported platforms and fewer existing examples. But there must’ve been a reason. Oh well, it’s lost to time and memory now.
By the end of March, the majority of the game was ported and working. I still fixed bugs here and there but the most of the job was done. Finally Downland was natively playable on a new platform, forty years after its original release. I felt accomplished! Another goal reached! It was time to think about what was next.
But First, A Fruitless Detour!
Then I took a two month break.
With my increased confidence in reverse engineering I foolishly decided to try a bigger project.
I’ve always been a huge fan of the Expert Software Sega PC games from the mid-1990’s. I currently have a collection of about a dozen titles from that series. Like with Downland I had attempted to reverse engineer some of those titles like Panzer Dragoon and Sega Rally Championship. But I never really got very far. But this time I swore to myself with these newly acquired Ghidra skills I’ll finally figure one of them out. For this attempt I went with Virtua Fighter Remix because I thought it was a “simpler” game. Simpler game means be an easier time, right? Spoiler: it was not.
I did figure out a fair bit of code and found some unknown secrets, but the path to reverse engineer anything close to 100% was going to be way too long. I wasn’t ready for that kind of multi-year commitment so I returned to Downland. It was fun and interesting while it lasted, though!
Back On Track And Time For A Plan
After that dalliance, it was time to start porting the game to consoles. But which ones, exactly?
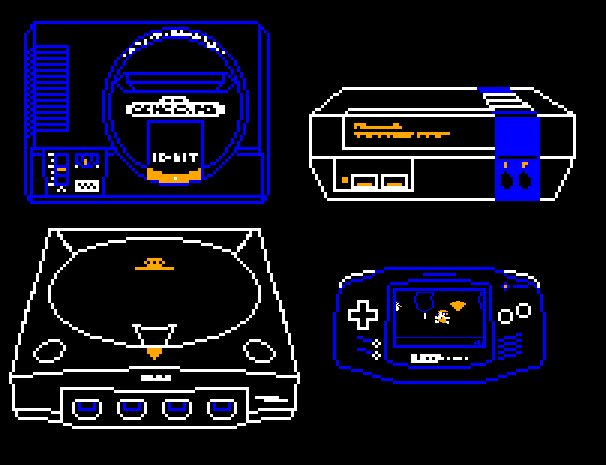
For me the choice was obvious. I’m a big Sega hardware fanboy so it was only logical that my initial goal was to port the game to all their consoles. I started with these core five:
I told myself if I could port to these, then I’d be more than happy.
I had a high confidence that the C code would run great at 60 fps on the first four consoles. I had never done any Dreamcast work but the hardware is really powerful and I knew the dev community was great. I had done a teeny bit of Saturn homebrew and it was pretty fine too. I spent more than a year on various 32X projects so I was pretty familiar with it, although my Achilles heel was sound playback. Genesis I had been doing homebrew since the 2010’s so I knew that was going to go well.
I was less sure about the 8-bit Master System, however. I had worked on a homebrew project for the system recently and I really struggled with getting the performance up to a reasonable level. But Downland’s needs are a lot lighter than what I was trying to accomplish with my own project, so I was still very hopeful that it was doable. Even reaching 30fps would be more than acceptable. But I told myself I’ll worry about that when the time comes.
Development Strategy
These were going to be straight, no frills ports. I decided at the start that I wasn’t going to change anything in the original game if I can help it. They were going to start and run just like the original on CoCo hardware and there wouldn’t be any gameplay or graphics changes unless some hardware limitation required it.
Time Limit
I set myself the goal of porting the game to the core consoles by the end of 2025 and after that point, I’d stop porting. I’ve burned myself out too hard on projects in the past(see 32X, Master System) so I thought it important to give myself a time limit.
Code Structure
Every platform can have wildly different hardware. They have different ways to display graphics, to play sounds, and to handle input to name a few.
I decided at the start to keep the core game code and the platform specific code separate. Every version will use the same core game code running in the background and have a bespoke layer per platform to handle the visuals, sound and inputs.
The advantage of keeping a centralized core game code is that a bug fix on one platform improves all the others.
All the ports for the various platforms are in the Downland_C platforms folder. Almost all of the ports have very similar folder structures.
Porting Requirements
Each platform needed:
- A supported C compiler for the chosen console.
- A C-based hardware API.
I wasn’t going to write either of them from scratch because I don’t have that kind of patience or time, so I was reliant on pre-existing solutions. Luckily a lot of consoles are still popular enough to have both. I’ll go through what I used in a later section.
IP Limitations
To be clear I do not own the rights to Downland’s intellectual property. Michael Aichlmayr’s statement in his email to L. Curtis Boyle about his okay to copy the game didn’t make me feel comfortable enough with distributing ROMs and ISOs containing the game’s IP, even if it’s an over forty year old game. So that’s why to run the game on PC or to build the game for consoles, you need a copy of the original Downland V1.1 ROM.
No, it’s not at all convenient, but I wanted to respect the original author.
Sound Emulation? Yeah, Right!
I didn’t want to emulate the game’s DAC-based sound if I didn’t have to. Sound programming is hard and I’m lazy. It’s one of those things that I never get right, I have no patience for, and will actively avoid (see 32X sound programming). So from the start I decided to use pre-recorded sound samples where possible.
I pre-recorded the game’s eight sound effects (run, jump, land, climb up, climb down, pickup, splat, screen transition) and stored them as WAV files. I would change their sample rate and bit rate according to console capability. For the 8-bit consoles I replaced them with admittedly not-very-accurate homemade PSG-based or APU-based effects. Some 8-bit consoles can play samples, but I wanted to keep things simple.
Even with this “simple” strategy, I still got a lot headaches trying to get some of the ports’ sound playback to work. See Below.
Without Further Ado
Alright, let’s talk about the ports themselves. I will go through each port chronologically, going through various details and findings.
Sega Dreamcast (2 days – May 24 to May 26)
Dreamcast homebrew development is where all the cool kids are. I’m always hyped up reading falco_girgis‘ posts about his latest work or news about their homebrew community. So I just had to try it.
SDK Used: I used DreamSDK to build the port. The install was easy, getting setup with straightforward and the support online was great. No complains at all when using it!
Testing: The Redream emulator and a Sega Dreamcast with a Terraonion MODE.
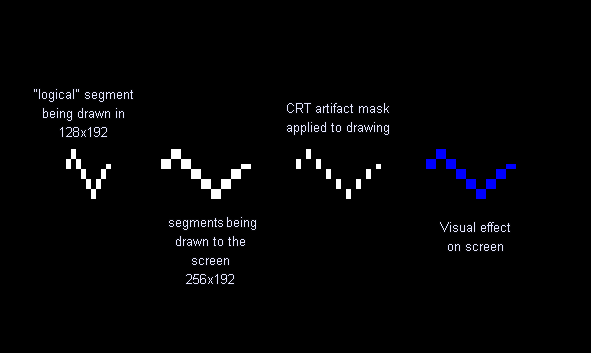
Port Highlights: This was the pretty close to the most ideal port imaginable. The hardware easily runs the core game code as-is full speed without a sweat. I only had to write minimal code for wav playback and joystick handling. For graphics, the console is powerful enough that I could perform a basic CRT artifacting effect on the game’s framebuffer and copy that to the screen.
I had the whole thing wrapped up and running on actual hardware in two days. A great start that obviously meant that all the other ports will be just as easy and straightforward!
Challenges: The only real head-scratcher I encountered was with playing looped sounds. They didn’t seem to stop when I wanted to. It turned out that I was playing stereo sounds and I was stopping only one channel. Once I realized that and stopped both channels, looping sounds worked correctly.
Known bugs: Sound playback might not be 100%. I’ve had issues where the jump sound suddenly turns into static. Tried to mitigate it but it’s probably not completely fixed.
If I Could Go Back: I’d like to add VMU support for something. Maybe have the player character’s animations play on the VMU’s screen like the lives icons do at the stop of the screen. I’d also like to add a four player simultaneous mode. That would be fun!
Final Thoughts: This was a fun beginning. I’d love to do more Dreamcast stuff as it’s a great platform.
Sega Saturn (22 days – May 27 to Jun 22)
I had experimented a little bit with Sega Saturn homebrew in the long distant past, and I don’t actually remember which SDK I used. Nowadays there are many options, including Jo Engine, libYaul, and SaturnRingLib.
SDK Used: For Downland I went with SaturnRingLib, the new hotness on the Saturn homebrew scene. Looking back, I don’t think it was the best choice. It was still new and I feel not completely battle tested. It wasn’t as easy to use and not as flexible as I would’ve liked. It had its way of working that didn’t gel with mine so there was friction there. But in the end I made it work.
Testing: The Mednafen emulator and a Sega Saturn with a Satiator.
Port Highlights:
- Unlike the Dreamcast I couldn’t rely on brute pixel pushing power. The new strategy was to draw everything as sprites and background tiles. At game start up the 1-bit sprite graphics would get extracted from the ROM stored on disk and converted to 8-bit sprites with the CRT artifacting effect pre-applied. And when the chamber was drawn on entry, the 1-bit clean buffer was converted as well. Finally I would run the full game for one frame, inspect the game state for object positions, and draw them on the screen with 8bpp sprites. I pretty much used a variation of this technique for almost all the other ports.
- The player regeneration effect was achieved by pre-generating a series of frames at game start. I think I went this route because maybe updating sprites on the fly wasn’t possible but I don’t remember exactly why.
- Text in the main chamber is drawn using sprites and not with background tiles.
Challenges:
- One limitation the SaturnRingLib had at the time was that it couldn’t play sounds in a loop. To simulate the effect I counted the number of game ticks each looping effect took to play once. For example the run sound effect took 64 frames to play. Then when I played it I ran a per-tick countdown timer from 64 and once it hit zero I would replay it.
- I couldn’t figure out how to achieve the per-pixel screen transition effect. I had reached my third week of doing the port and I was losing patience. I wanted to be finished with it so in the end I used the Saturn’s background layers to perform a cross fade. It works but it’s not very Downland-like.
- Waiting for the Saturn boot screen to finish (even if I pressed a button) every time I tested the game got on my nerves real fast.
Known Bugs:
- Sometimes a sound doesn’t not play.
- Sometimes a looping sound doesn’t stop
- If you make a door appear and then change rooms, the door will disappear during the transition. But it’ll work correctly the next time in the room.
If I Could Go Back: I don’t know if I’d be able to get the same results, but I’d try a different Saturn homebrew SDK. I’d also try to get that room transition effect correct.
Final Thoughts: While I like the Saturn I really didn’t have fun with this port.
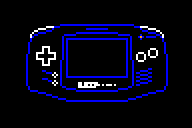
Game Boy Advance (11 days – Jun 23 to Jul 3)
After the struggle I had with getting the Saturn version finished I needed a palate cleanser. And I wasn’t ready to tackle the Sega 32X version because I knew I was going to spend a long time on it (spoiler: I did). So I went in a completely different direction and started a GBA port.
I never worked on the GBA before and I wanted to learn something new. Considering the hardware I was pretty hopeful that a port would work well. And it turns out it did!
SDK Used: I built the game with Devkitpro as I heard good things about it. It also supports lots of other Nintendo platforms, so there’s a good chance I’ll use it again.
Testing: the mGBA emulator and thanks to John Bunday for testing on hardware. Only much later did I find an EZ Flash cart to test on hardware at home.
Port Highlights:
- The graphics are handled the same way as on the Saturn where it extracts game data from the embedded ROM and uses the hardware to display 8bpp CRT artifact-ized versions of the objects and backgrounds.
- At start up I draw all the backgrounds offscreen and process them to create a deduplicated set of tiles and a dozen tile maps. The resulting data was small enough that I could copy them all wholesale to video memory. It only takes a few seconds at start up, and switching backgrounds becomes as simple as updating a register.
- Being used to working with VDPs on Sega consoles, the way that I could update sprites and backgrounds by simply writing directly to areas in video memory was refreshing.
Challenges:
- Downland uses a 256×192 screen resolution and the Gameboy Advance has a 240×160 screen resolution. The smaller screen meant having to use scrolling. Technically this was easy but it does make the game more unfair as you can’t see everything around you. You might get killed from a drop above you didn’t see and you can’t see doors when they appear when picking up keys.
- The title screen and get ready screens had to be reworked to fit the screen.
- The in-game UI had to be minimized. The score and timer were moved to the top of the screen and the player id and chamber text were removed. I did manage to keep the animated player lives icons, which is a Downland trademark. They were put inside an opaque row at the top of the screen so that they won’t be mixed up with the background graphics.
- I really wanted to pull off the screen transition effect perfectly so I had to figure out how HDMA worked. It took me a minute, but I’m glad I could pull off the authentic effect.
Known Bugs: There’s a visible split-second scrolling bug after dying and returning to the title screen.
If I Could Go Back: There’s not much I’d want to do to the port. Maybe add co-op gameplay through the link cable? Gameboy Player support?
Final Thoughts: I finished this port loving the GBA hardware. I learned a lot and really enjoyed my time with it. The only knock I have against it is the 240×160 resolution. I could spend the rest of my days making games for a GBA with a 256×192 screen.
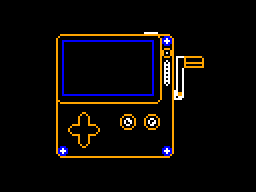
Playdate (3 days – Jul 3 to Jul 5)
I wasn’t ready to move on to the Sega 32X yet. I wanted another “fun” console to work on. And the Playdate looked lots of fun.
SDK Used: The Playdate SDK (duh). The C-based API wasn’t bad at all. It was pretty straightforward to use.
Testing: The Playdate emulator and a Playdate device (but only once!)
Port Highlights (aka And Here I Thought The Dreamcast Port Was Easy):
- Downland has 1-bit graphics and the Playdate has 1-bit graphics. I basically just dump the core game framebuffer onto the screen and that’s it.
Known Issues: My friend who has a Playdate device tried it only once, told me “it crashed”, and then never said anything more. So… I guess it doesn’t work but I can’t debug it!
If I Could Go Back:
- Maybe get a Playdate device. But those things are expensive.
- I could make the 1-bit sprite graphics a little cleaner. As they’re setup for the CRT artifacting effect, they’re not the nicest looking.
- I could try to take advantage of the larger 400×240 screen resolution.
- And most importantly, I’d need to find a use for the crank.
Final Thoughts: I thought Playdate development was pretty streamlined. I don’t know if I’d make anything for it again, but I liked its simplicity, flexibility, and fun factor.
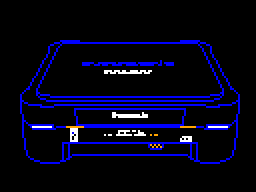
3DO (17 days – Jul 5 to jul 22)
Another console not on my list. By now I’m simply in denial, avoiding my Sega 32X problems.
I had never done anything on the 3DO before, so it had similar appeal to the GBA. Released before the Sega Saturn and Sony Playstation I was confident it was powerful enough for me to make a decent port. I also wanted to give the 3DO some love, porting a neglected game to a neglected platform.
SDK Used: 3do-devkit. Its maintainer, trapexit, was a great help.
Testing: Mostly used the 4DO emulator with additional testing on Pheonix and Opera. Testing on hardware was done by the friendly folks on The 3DO Community Discord. They really helped out. Shout out especially to Archive3DO for his support.
Platform Highlights:
- With the exception of one major thing, see below, porting the game over was pretty straightforward. The machine was flexible enough for me to attempt to draw the framebuffer with a CRT artifact effect to the screen, but sadly it wasn’t fast enough. So I switched to using the cel system to draw sprites and backgrounds.
- I achieved the transition effect by drawing six 256-pixel wide sprites across the screen and using the cel’s many parameters to clip them vertically.
Challenges:
- The major thing: the biggest one was coming to grips with the cel-based way of doing things. It was pretty difficult to get right and it took me four days to get one sprite correctly displayed. But you know what, it was the good kind of challenge. When I solved it, I felt accomplished. Other than that, every other issue was pretty minor.
- The C compiler is old-school, where you need to declare your local variables at the top of the function. Had to rework the core game to compile with it.
- The compiler also didn’t like the game’s struct types as-is so I had to mark them all as __packed.
- Struggled a bit figuring out which API to use to load a file from disk. The super friendly peeps on the 3DO Discord helped me out.
- Waiting for the long boot screen to go away (which I couldn’t dismiss!) on start up really tested my patience. It was worse than waiting for the Saturn’s.
- Encountered a bug where I would pick up a treasure on the second screen and die. Turns out it was the ball that was floating mid-air, invisible. I wasn’t de-initializing it in chambers where it wasn’t used. It affected all versions.
Known Issues: The sound playback crackles on hardware (and emulator? I don’t remember…) and I have no idea why. I won’t ever be able to solve it without having a 3DO at home. And those things are rare and expensive.
If I Could Go Back: I’m pretty satisfied with the port as-is, so there’s nothing critical that I’d change. If there was one thing I’d try, maybe I could try that CRT artifact effect again using the game’s framebuffer like on Dreamcast but this time using assembly.
Final Thoughts: It wasn’t an easy port, but solving how to use cels felt rewarding. I’d like to one day try another project on it. Part of me wants to attempt a port of Cannonball, the Outrun engine to it. But only after all my other million projects are done.
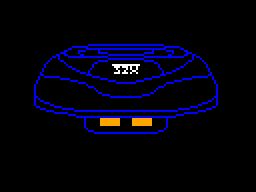
Sega 32X (20 days – Jul 20 to Aug 8)
Finally I put my big boy pants on, grabbed the bull by the horns, and decided to tackle this version. I was fairly confident I could make it work, but I knew I was going to spend a fair bit of time figuring out how to play sound on it. I’ve avoided doing for years and it’s my secret shame.
SDK Used: Chilly Willy 32X SDK, using my barebones32xproject as a base.
Testing: My version of Gens Kmod emulator with custom fixes. On hardware, used a Sega Genesis Model II with a Sega 32X and an Everdrive X7 cart. I wish I could’ve been able to afford the Mega Everdrive Pro (hello Sega CD support!) but the X7 was advanced enough to sport a USB port so I could deploy directly to the hardware. Saved me lots of fiddling with copying to SD cards.
Thanks again to John Bunday for testing on the PAL version of the Sega 32X.
Platform Highlights:
- Like the 3DO version I first tried converting the framebuffer to 8bpp on the fly and performance was actually pretty comparable! But it wasn’t a viable solution. I love the fact that the 32X is basically just a framebuffer, but it’s way too slow to draw on.
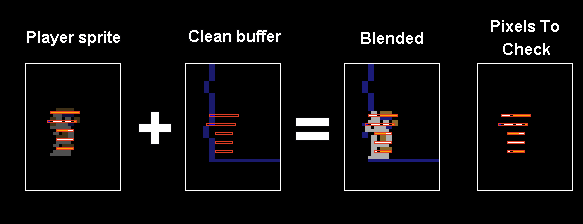
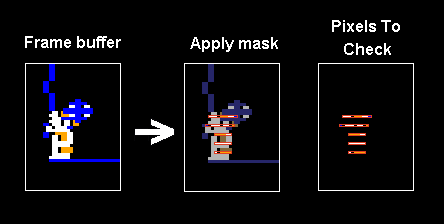
- So I went with a dirty rectangle solution, very similar to how the original game works. I draw all the objects on screen to the 32X’s framebuffer and keep track of the areas I’ve drawn to. Next frame, I restore the dirtied areas of frame buffer with the clean buffer. Then redraw the sprites.
- Like most other ports now, I extract the sprites and convert them to 8bpp CRT artifact’d versions.
- The secondary SH2 barely does anything. It runs the sound DMA interrupt. I think I could’ve put it on the main CPU. So yeah, I’m very much not using the hardware to its fullest.
Challenges:
- By far it was sound playback. It took an eight day side quest to finally figure it out for good. It works and I’m proud that I did it after avoiding it for so long.
- Integrating the sound playback side quest code revealed problems on the Genesis side. The joystick state became buggy and inconsistent. I couldn’t figure out what the problem was but switching the Genesis code to a simpler version made the problem go away. I absolutely love the 32X but it’s this kind of thing that doesn’t make me entirely enthusiastic about making software for it. I’m not patient enough to learn its intricacies.
Known Issues: The sound playback isn’t quite 100% solid. Chilly Willy mentioned that a small number of SH2 CPUs have an interrupt bug that needs to be handled correctly and I don’t think I am. I think the overlap of people who have a faulty 32X and who want to play Downland will be very small so barely anybody should be seeing any issues. *crosses fingers*
If I Could Go Back: I’d make sure the sound playback implementation is perfect. I’d need a faulty Sega 32X to test it with, though.
Final Thoughts: I felt a real sense of relief that I could finally finish a complete project on the Sega 32X. Getting that sound working was a definite highlight. I still waver if I ever want to make another full project on it ever again. I still dream of reverse engineering After Burner 32X to discover how they managed to get such great performance.
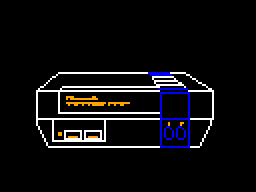
Sega Genesis (15 days – Aug 9 to Aug 24)
Here I’m working on familiar territory. I’ve been working on various Genesis homebrews since maybe 2011. I had no doubts that the machine could run the game at full speed. The 68000 is a monster.
SDK Used: No question, Stef’s SDGK. The gold standard. Don’t be silly using anything else.
Testing: My version of Gens Kmod emulator with custom fixes. On hardware, the same Sega Genesis Model 2 with an Everdrive X7 cart.
Thanks to John Bunday for testing it on a PAL Mega Drive.
Platform Highlights:
- I had lots of pre-existing projects I could’ve based this one on, but it had been a long time since I had tried the latest version of SGDK. So I started from scratch. It was still pretty straightforward to get up and running.
- For generating the sprites and background tiles, instead of doing it at game start up I decided to build an command line tool that would extract and generate them as a build step. I wanted to experiment with this to get ready for the upcoming 8-bit versions of the game. Those versions won’t have the horse power nor the room to generate the sprites and tiles on the fly. The DLExporter tool I wrote generates 8bpp pngs of all the sprites and the deduped background tileset, as well as C code for tilemaps.
- Because the hardware is tile based, writing text could only be done on 8×8 tile boundaries, so they’ve moved around compared to the original.
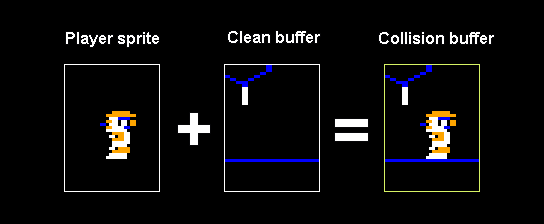
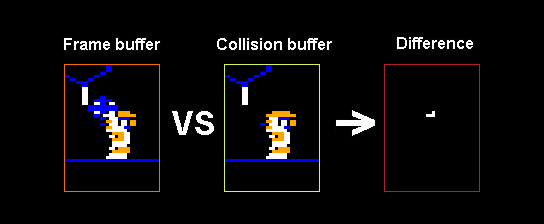
- It still uses the framebuffer and clean buffer to perform object collisions, but this is the last version that does so.
- The game uses the XGM2 sound driver and I was real thankful that there was a good pre-made solution to play wav files. There was no way I was going to write a Z80 sound driver. I’d rather write COBOL. (ok, maybe not)
- The SGDK’s resource builder automatically converts .wav files to the correct data format for playback. This too was really handy and a lifesaver.
- The XGM2 sound driver supports three sound channels. Downland only really plays one sound at a time but I spread out the samples to different channels for the heck of it. It was free.
- The achieve the transition effect, I draw the game on the background plane (Plane B) and the transition effect was performed with the foreground plane (Plane A). The animated moving line was done using pre-animated tiles of the transition line and I updated the foreground plane’s tilemap every frame.
Challenges: I can’t remember anything that was particularly difficult. Working on the Genesis is always very smooth.
Known Issues:
- The sound can be scratchy. I haven’t been able to figure out if it’s the driver or the source samples.
If I Could Go Back: There’s no much I can do to improve this version. Could try to improve the sound.
Final Thoughts: Everything went great just as I hoped. It’s no surprise why there are so many Genesis homebrew games out there. The hardware is powerful with a great dev toolkit, and it’s well supported with a large community of developers and fans.
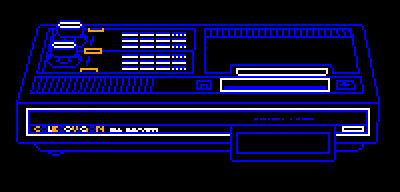
Sega Master System (36 days – Aug 24 to Oct 2)
This is where the real test began. Could I get the Downland_C code running at full speed on an 8-bit console? I knew I could get something running but I wasn’t sure if I could get 60fps.
Don’t let the long 36 day development time fool you. I had a great time working on this version.
SDK/Tools Used: Like the SGDK on Genesis there’s only one devkit for SMS and that’s devkitsms by sverx. I used SDCC for compiling, PSGLib for sound playback, and Deflemask Legacy for composing sound effects.
Testing: Emulicous by Calindro for emulation. Its debugging features are excellent. On hardware, as I don’t have an actual Sega Master System, I once again used my Genesis Model 2 with an Everdrive X7.
Thanks to John Bunday for testing it on a PAL Sega Master System.
Platform Highlights:
- DLExport doing a lot more work, exporting game data in addition to graphics. I’m not embedding the original ROM in the game anymore to save on ROM space.
- Optimization was the most important thing. The core game code ran but was way too slow as-is. I had to fork the game code into a special 8-bit version.
- The framebuffer was removed. Object collisions were now handled with bounding boxes only.
- The clean buffer isn’t built on demand. The clean buffer for each chamber is now pre-built in ROM. .
- Struct types have been eliminated and converted into global variables.
- Lots of profiling later, using Emulicious’ great debugging tools, managed to hit 60fps. Worst case performance scenario used only 80% of CPU time. This made me so happy.
- To help achieve 60fps, the game alternates collision checks between the drops and everything else every frame.
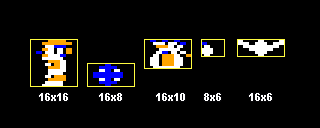
- The game uses 8×16 sprites to reduce the number of hardware sprites used. Two 8×16 sprites are used for the player, ball, bird, and pickups instead of four 8×8 sprites, reducing processing time.
- The entire code managed to fit under 32k without trouble which was nice, and later on managed to get that down even further to under 16k, fitting in one single bank. This was useful for the SG-1000 and ColecoVision versions.
- The tiles used by sprites and backgrounds barely just fit in the VDP tile memory which was also nice. I had to trim the number of pre-drawn regeneration sprites a little, though.
- The hardware limit of sixty-four sprites limit wasn’t a big problem. There are areas where the game uses more than eight sprites on a line, but I implemented a flicker mitigation strategy to minimize it.
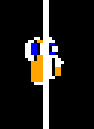
- Unfortunately I couldn’t pull off the vertical per-line screen transition effect but instead I did a full screen horizontal wipe effect that I think still works as a Downland-authentic screen transition. The wipe effect changes direction depending on which door you enter.
- Bank switching wasn’t much of a burden. With data for one chamber stored in one bank, and everything else in the fixed bank, I just switched banks whenever the player changes chamber.
Challenges:
- The SDCC compiler output was unpredictable. One function would be fine but a similar looking function would have crazy bad performance. I couldn’t even come up with strategies to guess what kind of speed difference I’d get. I had to benchmark every change.
- One optimization example: the code that displays the timer at the bottom of the screen was more expensive than the entire player update function. I spent an unexpected amount of time optimizing it.
- Sound playback, my old friend, once again gave me trouble. Trying to reproduce the original Downland sounds was a long wild goose chase. I spent six days trying to make it work but everything I tried was a dead end. Once I accepted that I should just make sounds from scratch using the PSG hardware as-is, I managed to move forward.
- The VDP sprite collision flag wasn’t as useful as I had hoped. While the game basically just checks collisions between the player and everything else, the hardware sprite flag is set whenever ANY sprites overlap. So common situations like having two drops on top of each other, or the ball touching a pick up would activate it. In truth it wasn’t a big issue because bounding box collisions were sufficiently fast, but finding a way to get collision checking for free would’ve been nice.
Known Issues: None that I remember.
If I Could Go Back: I freed up so much more memory with the SG-1000 version that if I wanted I could remove the pre-made clean buffers in ROM and implement a true clean buffer in RAM. The 128k ROM size it currently is wouldn’t be viable had the game released for the Sega Master System in the 1980s. It would’ve been too expensive for what it was.
Final Thoughts: I didn’t know it at the time, but getting this version to work set the foundation for three more ports (Game Gear, SG-1000, ColecoVision). The challenges I encountered were the good kind. Learned at lot. I’d sure like to do another Master System project one day.
Time Bonus!
At this point the core list was finally done. But I didn’t feel like I was finished. I still had enough gas in the tank to keep going.
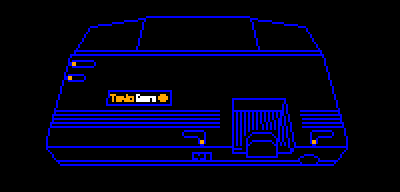
SG-1000 (9 days – Oct 3 to Oct 11)
The SG-1000 was Sega’s first home console, the Sega Master System’s predecessor. While its graphics capabilities are more primitive than the Master System and has only 1k of memory, it has the same Z80 CPU at the same clock speed and the same PSG sound chip. I hadn’t planned on making a port to it but with the hardware being so close I just had to try.
SDK/Tools Used: Once again devkitsms by sverx. SDCC for the compiler. PSGLib for sound.
Testing: Emulicous by Calindro. I couldn’t test on hardware since I have neither SG-1000 nor Sega Master System.
Platform Highlights:
- All the performance issues were already solved!
- In a reversal, the sound was finished first!
- Sprites are entirely one color, chosen from a fixed palette of 16 mediocre looking colors. There’s no CRT artifacting effect available to simulate more colors. I had to choose colors for each type of sprite and update their graphics to make them look presentable. I made the bat-bird more bat-like.
- The SG-1000’s VDP is real quirky: the background tileset is actually stored three times in VDP memory. Each tileset is used by one third of the screen. Never saw that kind of configuration before.
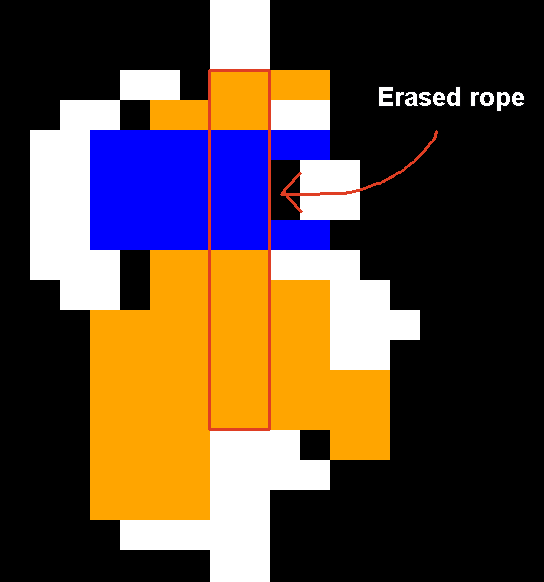
- The SG-1000’s VDP is real quirky, part 2: each tile is actually 1-bit but each row can have one color. It affected the background graphics a little bit, basically just the tiles with horizontal ropes, but it’s barely noticeable.
- The sprite hardware has a limit of 32 sprites on screen with a limit of no more than 4 sprites per line. That seems like a worse limitation than on the Sega Master System but it turns out one sprite can be a full 16×16 pixels. The game is just a little bit more flickery when there’s a lot of drops on the same line. The game runs probably a bit faster because it only needs to handle one sprite for pickups, the ball, the bird, and the player.
- I managed to get the RAM usage to less than 1k. I was already hovering just above it on the Sega Master System and at the time I couldn’t find a way to bring it lower. The main problem was that I was using two instances of player data, one for each player. I couldn’t fit them both and I had to consider removing the two player mode. Then I realized that the original game actually managed to fit two players with only one instance of player data. All the code I had converted already supported it! So once I realized that I just got rid of the second player data and everything fit into memory. I’d like to thank Michael Aichlmayr for his foresight.
Challenges:
- Like the Sega Master System, the rom is larger than normal because of the pre-drawn clear buffers in the different banks. The problem is that on the SG-1000, carts don’t support banking by default. The port assumes that it’s running on a cartridge that does. So the game is pretty much emulator-only (Emulicious-only?) at the moment.
Known Issues: I can’t confirm if it’ll run on hardware.
Final Thoughts: This was also a fun port. It felt good to still find optimizations that were worthwhile.
Game Gear (6 days – Oct 12 to Oct 17)
Man, if I did Master System and SG-1000 might as well do the Game Gear!
SDK/Tools Used: Everything is the same as on SMS. devkitsms by sverx. SDCC for the compiler. PSGLib for sound.
Testing: Emulicous by Calindro as usual. I couldn’t test on hardware since I don’t have a real Game Gear, either.
Platform Highlights:
- With the exception of the screen size and minor handling of its extended color palette, the game is identical to the Sega Master System version.
Challenges:
- The Game Gear’s screen is 160×144, even smaller than the Gameboy Advance’s. Had to rework the title and the get ready screens, of course. You can see a lot less of the area around you so the game is much more unfair to play.
- Really had to simplify the in-game UI and I had to use sprites to do it. Now it’s just one life icon with a life count at the top left corner and a timer at the bottom right. I couldn’t fit anything else.
Known Issues: as many as the Sega Master System version.
Final Thoughts: This was a quick straightforward port. Compared to the original Sega Master System port, this one was almost free.
NES (18 days – Oct 18 to Nov 8)
I grew to hate working on this port. This was my first real NES project and I don’t think porting Downland to it was the best first project for it.
SDK/Tools Used: I chose llvm-mos because I wanted a modern optimizing compiler and it was in active development. The nesdoug samples were super helpful.
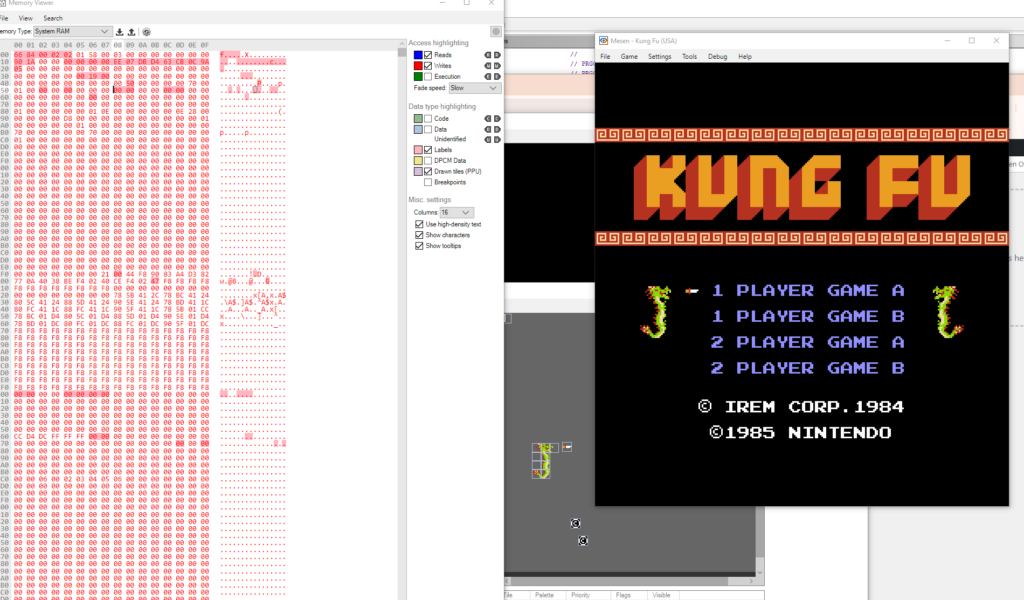
Testing: Mesen for emulation. Couldn’t test on hardware.
Platform Highlights:
- I just needed a simple bank switching cart so nothing fancy like an MMC1. So I chose the UNROM format. It has one fixed 16k PRG bank and 16k PRG swappable banks. I also only needed 8k in CHR data so it fit the bill.
- All the sprite and tiles could fit in a single CHR page, so that was nice. I appreciated the “export all tiles as a block in one shot and never think about it ever again” aspect of it.
- The famitone2 sound library doesn’t support looping sound effects, but it supports looping music. So the looping sound effects are handled like music tracks.
- Due to the previous 8-bit work, performance wasn’t an issue at all.
- Even though its available, I didn’t use any sprite flipping. Like the Sega Master System version, both the left and right versions of the player sprite are loaded.
Challenges:
- By far the single most aggravating issue about the whole port was trying to fit the game code into the fixed 16k PRG bank, and failing. It felt like the compiled C code for the 6502 was just so much fatter than the Z80 version. All through the port I continuously had to keep finding ways to move code around so that everything would fit, even going as far as adding special cases the core game code. I wasn’t very happy about that.
- When the code in the fixed bank would suddenly jump from a svelte 13k to over 16k, busting the limit, I really struggled to figure out the reason why. The llvm-mos team really helped me on figuring out that one.
- Just when I had figured out my fixed bank struggles, I had to then integrate sound effects and the famitone2 library. I eventually got everything to fit, but at what mental cost???
Known Issues: None that I can remember.
Final Thoughts: I did not enjoy doing the NES port at all. I wouldn’t port a C-based game to it like this again. I’d probably start from scratch with an assembly language version.
ColecoVision (1 day – Oct 20 to Oct 21)
While I was working on the SG-1000 version sverx started implementing ColecoVision support to devkitSMS. Once he had a new version ready to go I went off and ported the game to it. I took a break from the NES version to do it.
In terms of hardware it’s essentially identical to the SG-1000 and there were very minimal code changes.
SDK/Tools Used: devkitsms by sverx. SDCC for the compiler. PSGLib for sound.
Testing: ColEm, emultwo, and Gearcoleco. I don’t have a ColecoVision either so I don’t know if it actually runs on hardware.
Platform Highlights: It’s essentially identical to the SG-1000 version, with slightly different on-screen colors. I did however revisit the SG-1000 version beforehand, bringing down the entire game code to under 16k which made it fit into the ColecoVision ROM address space.
Challenges: None. Unless you’re talking about playing with those awful controllers.
Known Issues: Just as many as the SG-1000 version
Final Thoughts: The port was trivial and basically done in a day. I was quite happy to unexpectedly have a ColecoVision port because it’s my wife’s favorite console.
TurboGrafx-16 (aka FAIL aka The End)
I had spent some time looking into making a port to the TG-16. I couldn’t decide whether to use llvm-mos again or to use HUCC, so I experimented with both. In the end I couldn’t get past HUCC’s quirks so I went with llvm-mos, but I soon found out that its support for the TG-16 is very barebones. I couldn’t easily get it off the ground.
With the NES port having killed a lot of my momentum, me having ported the game thirteen times already, and the end of the year approaching, I decided to stop all my porting efforts there. There was no more gas in the tank.
Maybe I’ll revisit it once llvm-mos gets more TG16 support.
Final Final Thoughts
I’m done! Finished! No more! Here are my final thoughts!
- Completed thirteen ports!
- Super proud that the game runs at 60fps on everything.
- Also happy that I managed to get so many versions done in a year.
- With the exception of object collisions, managed to get the gameplay correct on every platform.
- There are only very minor bugs!
- Successfully ported to several consoles I had never developed on before!
- I’m happy that every port increased the portability of the game code. With the exceptions of the NES and 3DO ports, I didn’t have to add platform-specific parts to the core game code. I’m very confident that the game can now run on anything.
- Devkitsms is so good, handling four different platforms. Now it only needs MSX support (hint hint!)
Dreams of Future Ports
I’d like to think that the list of ports I did was “Phase One” of porting Downland to everything. But if I had the energy again what would a Phase Two look like?
I’d next like to concentrate on more neglected platforms. I found SDKs for the CD-I and the Atari Jaguar. There’s the NUON too which I’ve never looked into. Making an M2 version would be the ultimate neglected console achievement.
I’d also like to make versions for Linux, MacOS, and the web.
So I’d probably start with the above.
Of course since I finished the Sega console pantheon I’d have to do the same for Nintendo. I’m sure I’ll have an easier time with the SNES, Nintendo 64, GameCube, Wii, DS, and 3DS. Maybe the original Gameboy.
Having done the Saturn version I’d like to try the original PlayStation and the PSP.
I’d like to try porting Downland to arcade hardware. Platforms like the Capcom CPS, Outrun Hardware (there’s an SDK!), and the Neo Geo.
The ports I’ll least likely make are for 8-bit computers, contemporaries of the Tandy Color Computer like the Commodore 64, Apple II, and Atari 400/800. I have a lot less confidence that I’d be able to pull them off. But a MSX port should be trivial, devkitSMS willing.
Versions for the Amiga and Atari ST are much more feasible if I tried them.
What would be really silly is if I re-ported the game back to the CoCo. I wonder if I could get it to run full speed again. Maybe one day!
So that’s what a vague Phase Two (or Phase Three?) plan would look like.
So What Now?
With this post, I am taking a break from everything Downland. It’s still always on my mind, but I want to work on other projects for a bit. It’s been taking up all my free time since November 2024 so this is a good opportunity to recharge my batteries. I’ve been dabbling here and there on different things but I still haven’t been able to find that long term project I really want to get into. But I don’t mind experimenting in the meantime.
Until Downland pulls me back,
thanks for reading!


