• Things That Bother Me About the Original Transformers G1 Rear Box Art

    Image from https://tfwiki.net/mediawiki/images2/b/b3/G1_1984_backofboxbattle.jpg

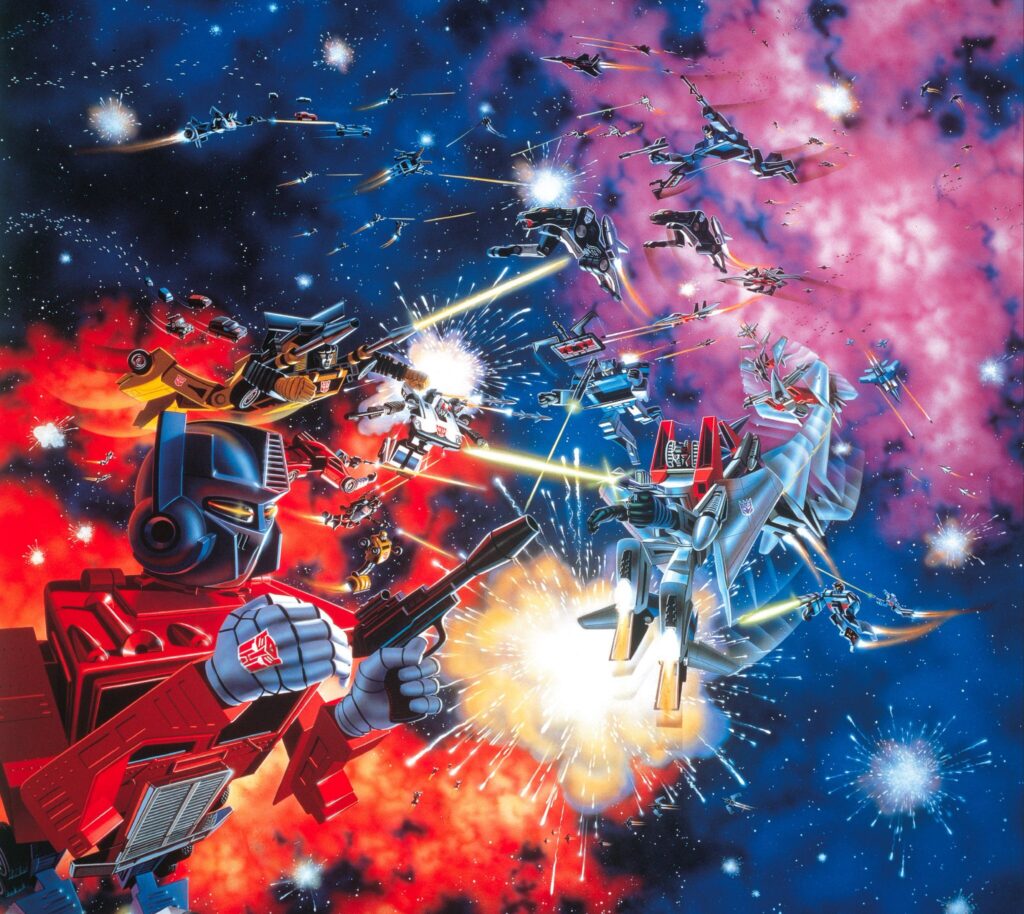
    Ever since I got a poster of the original G1 Transformers back-of-the-box artwork in my office, I’ve been staring at it a lot. And I’ve started seeing things in this forty-year old artwork that I never noticed before.

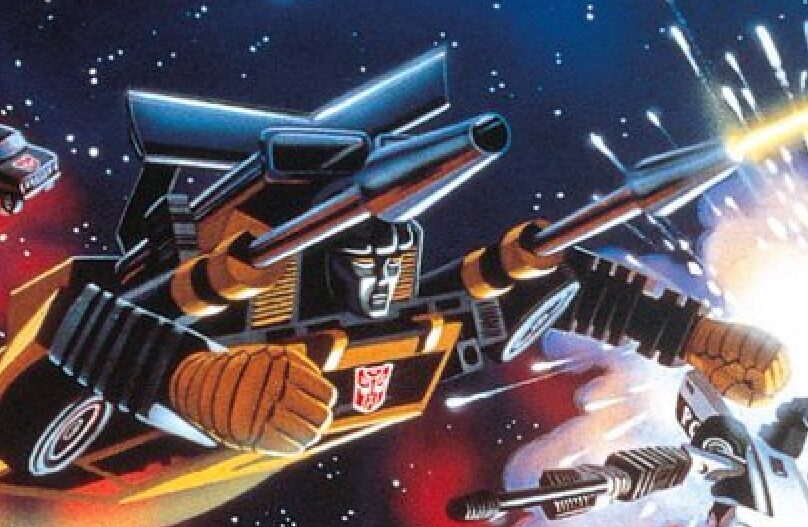
    Optimus Prime’s Detached Leg

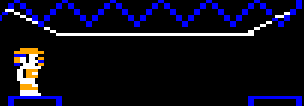
    Let’s look at a detail on Optimus from Botch The Crab’s version of the G1 box art as you see more of him.

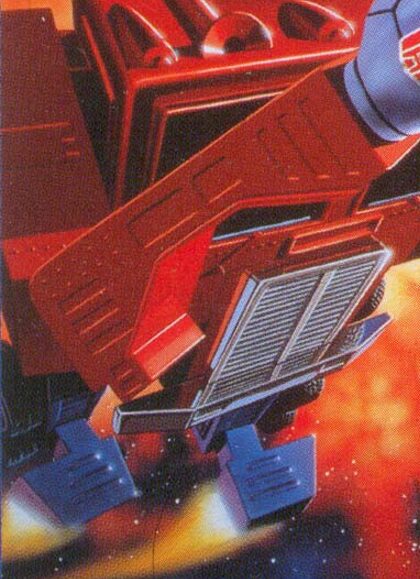
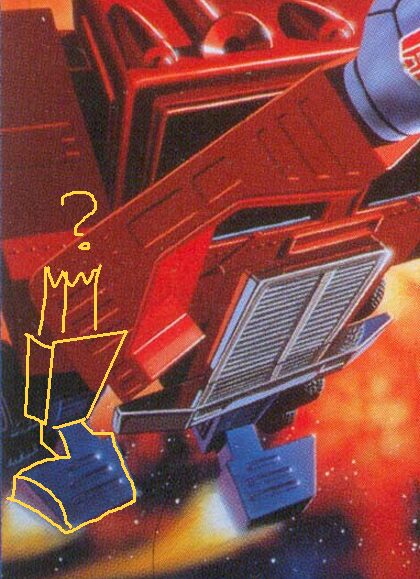
    The left leg seems fine considering the sharp perspective angle, but just where exactly does his right leg connect to his body? Going by the perspective his hip should be somewhere behind him.

    The actual toy and the front box art have the legs set more to the rear but the battle box art makes it look completely detached. Unless his legs are super short and has a giant beer gut?

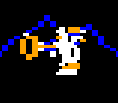
    Everything Wrong With Prime’s Giant Noggin

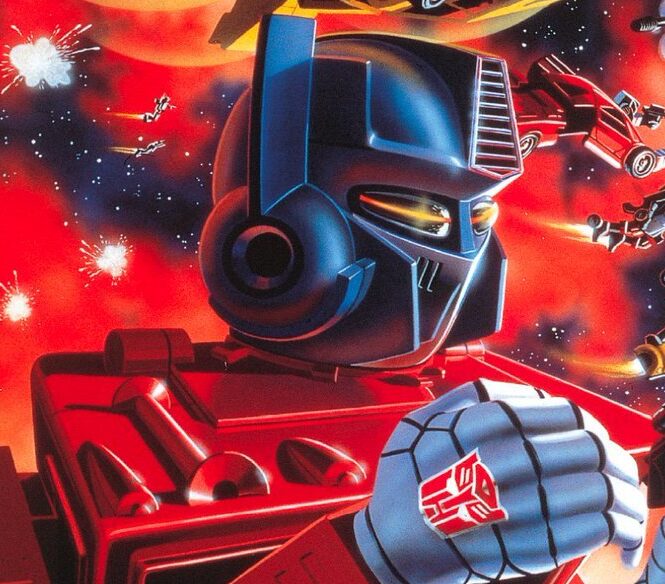
    • He’s got baby head-body proportions. His head is bigger than a boob window. It’s taller and wider than his grill abs. It’s probably got its own gravity and will absorb everything in its vicinity.
    • He’s got only one antenna ear.
    • His face mask goes directly straight down into his robot jacket, making appear less like a mask and more like he’s pulled his turtleneck sweater collar up over his face.
    • The eyes are cool though. Nice touch, no notes.

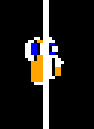
    But what is this thing???

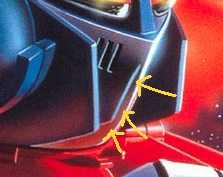
    It took me a minute to figure out that this is actually a reflection of Prime’s helmet off his shiny chrome turtleneck.

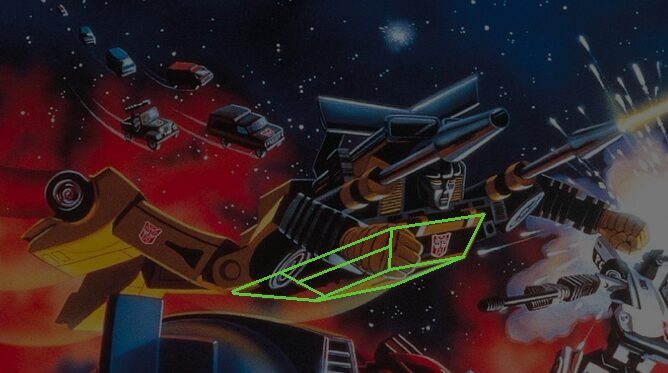
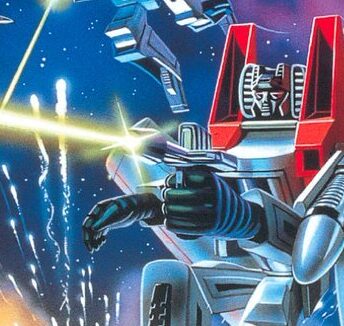
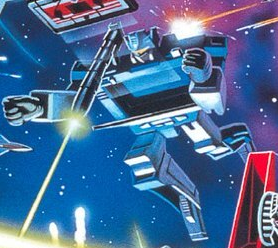
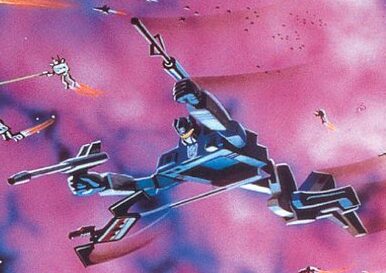
    Starscream is Broken

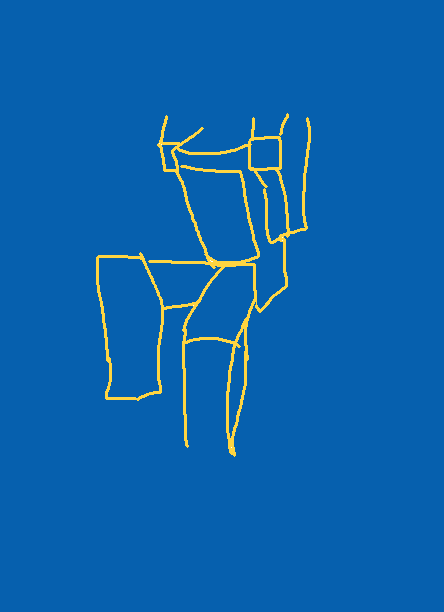
    This bot has no hips, pelvis, or crotch. Just two legs jutting straight out from his lower abdomen. Thank goodness he’s got shin thrusters because this boy ain’t walking.

    He’s got wings coming out of his shoulders and arms coming out the side of his… side boobs?

    One arm is much shorter than the other and seems to be missing an elbow.

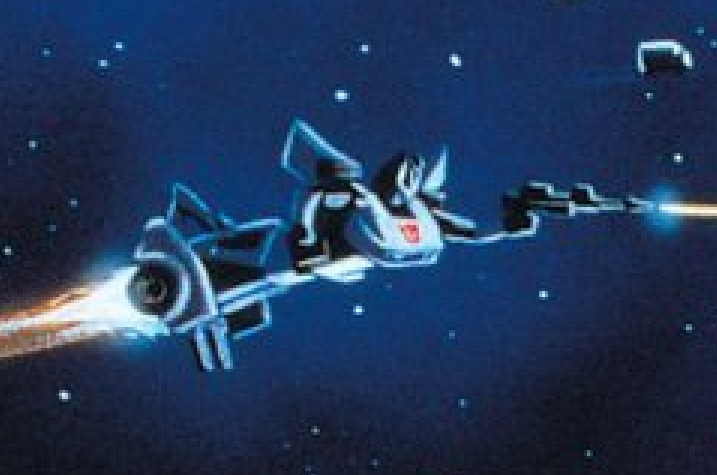
    I Don’t Know What Bumblebee Expects To Achieve With No Hands

    He’s got no guns or elbows or the ability to make a fist but that won’t stop him. He’s going in rubber tires first and ask questions later.

    His arms are like he’s flying around going “cha-cha-chaaa!”

    Note to self: This animation is terrible

    Everybody’s Hands Are Ribbed (for her pleasure?)

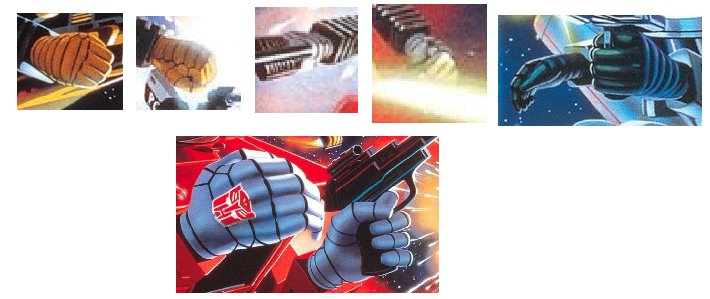
    Sure, they need to show segments on the flexible parts of the hands and fingers on these robots but it’s like everybody’s going alpine skiing after the fight.

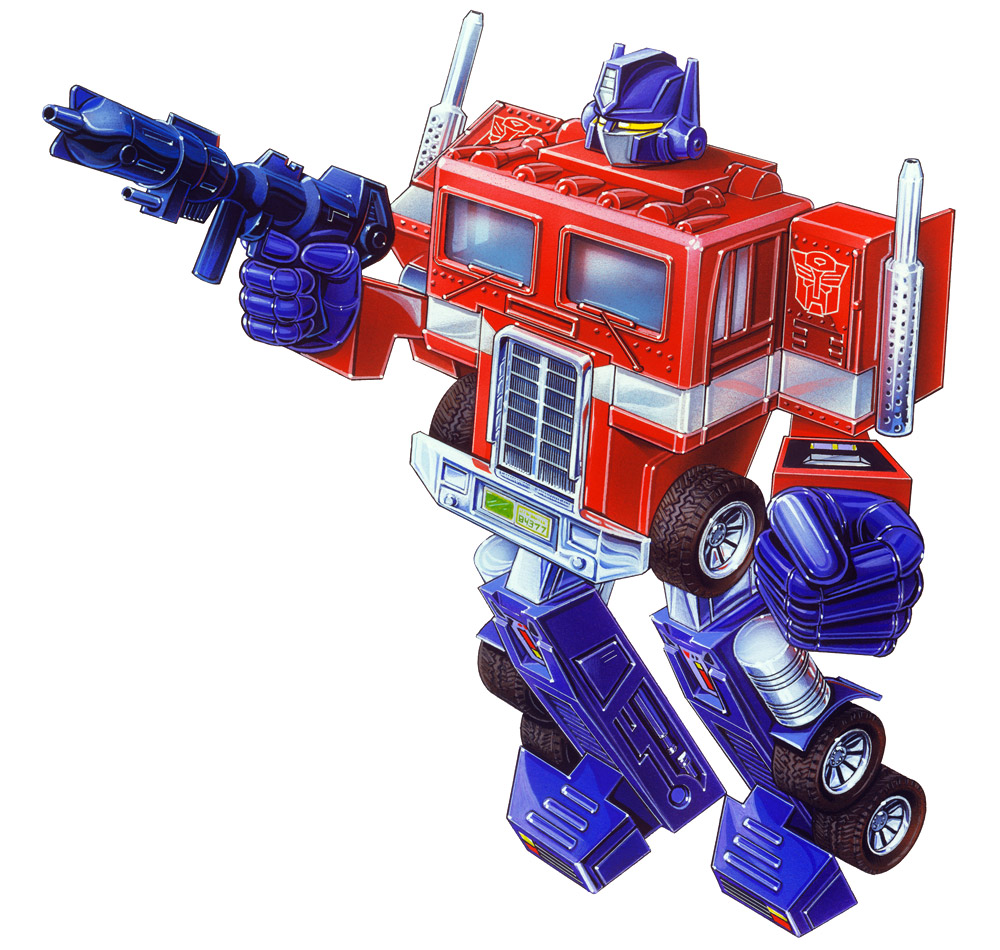
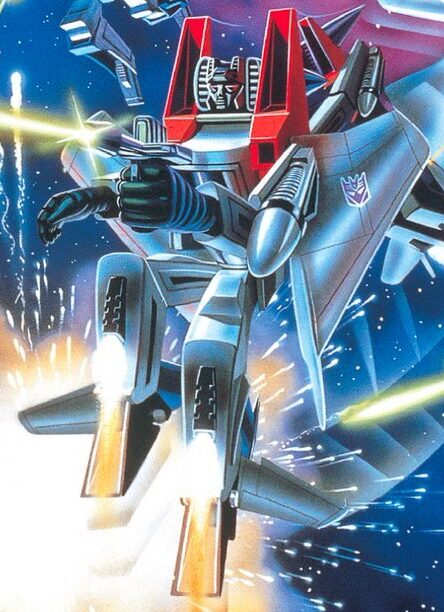
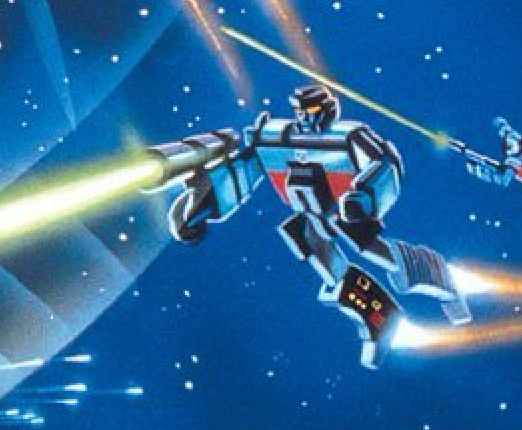
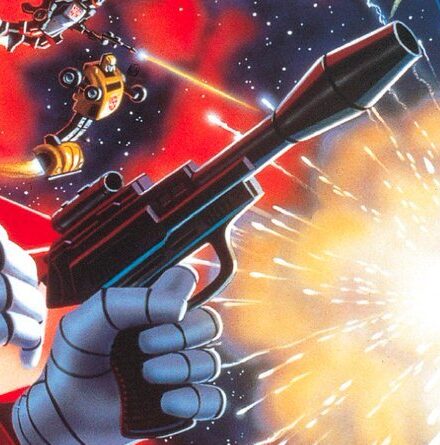
    Optimus Prime’s Poor Trigger Discipline

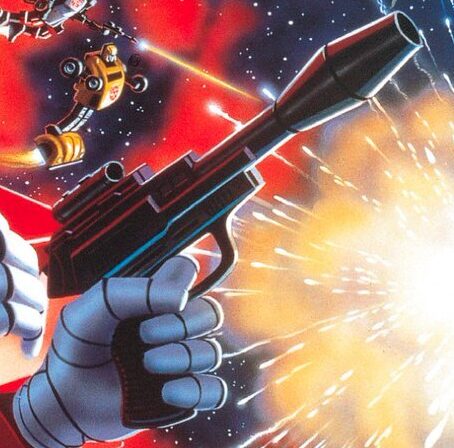
    He’s got his index finger pressing hard on the trigger, with his thumb holding it tight. I wouldn’t want to be a friendly around this guy.

    Then again, his weapon isn’t firing. Maybe it’s jammed. Maybe it’s out of power. Maybe the reason Autobots have such a hard time against Decepticons is because they’re terrible at maintaining their equipment.

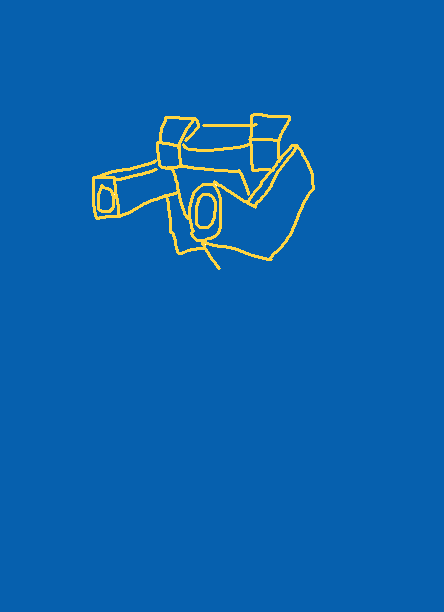
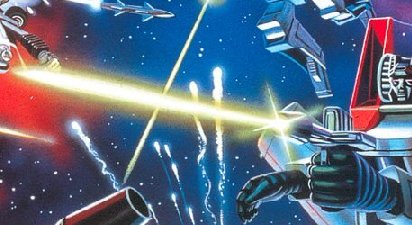
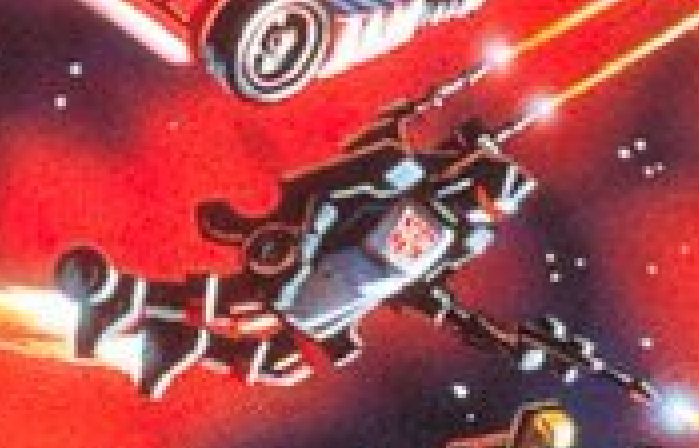
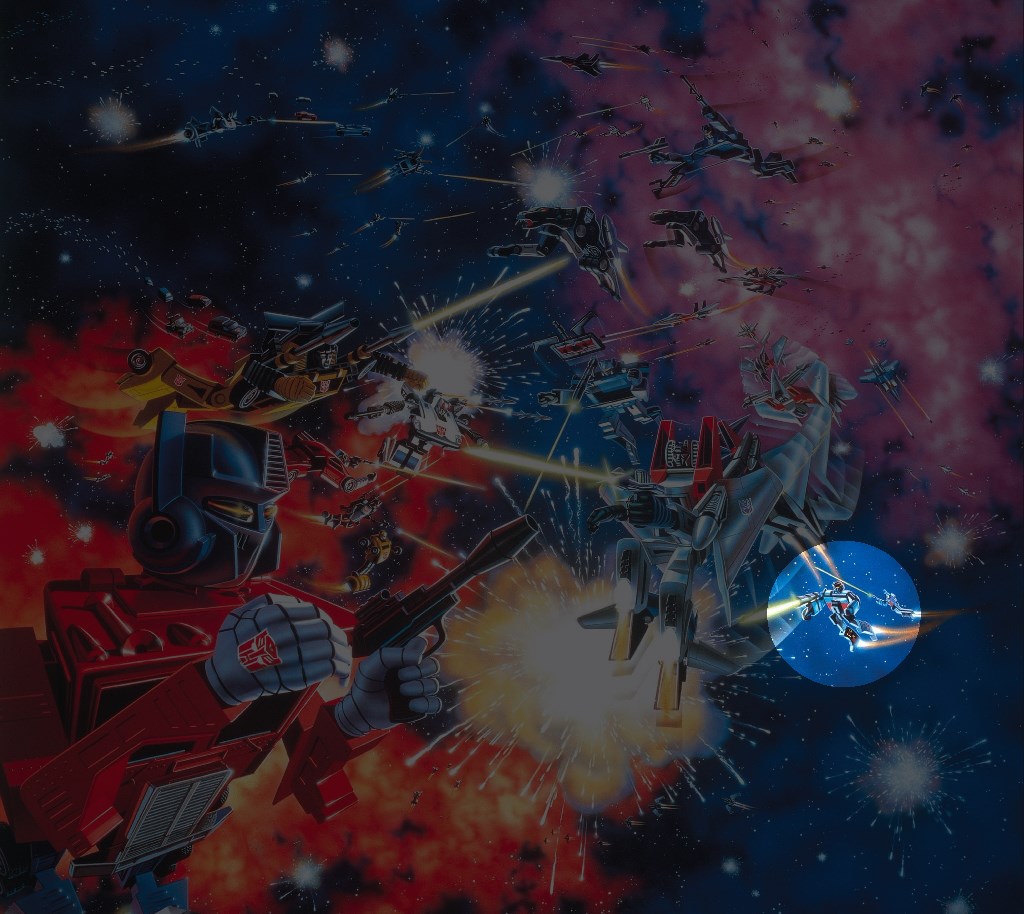
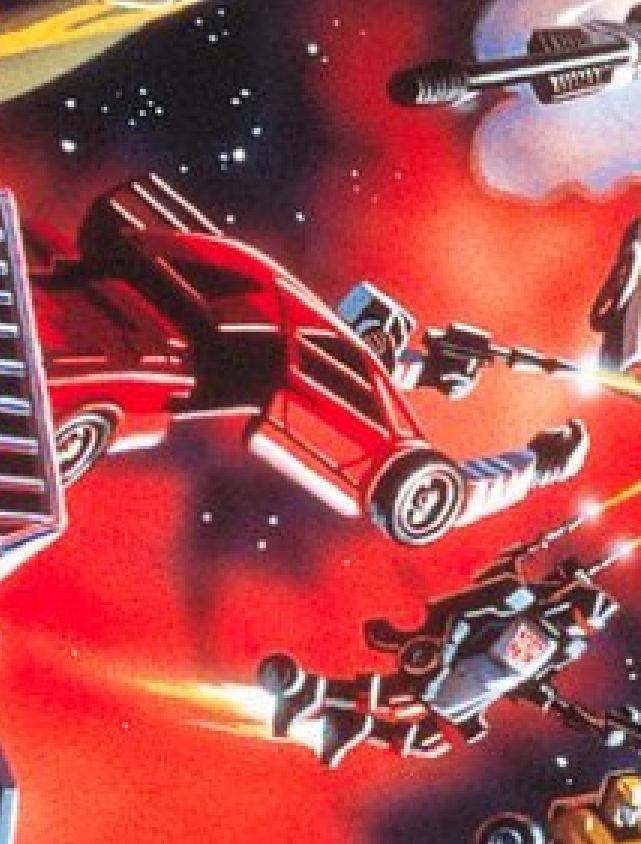
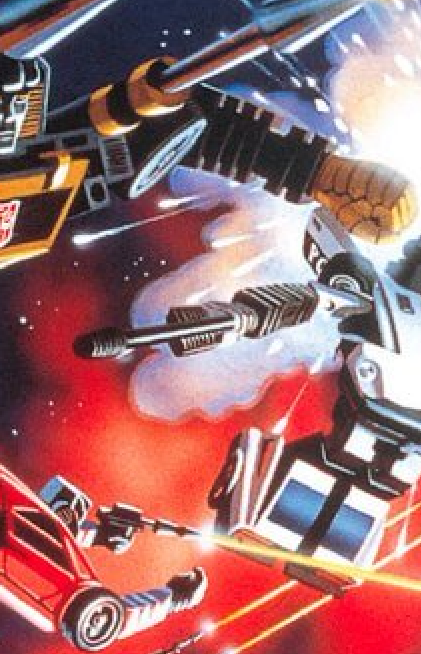
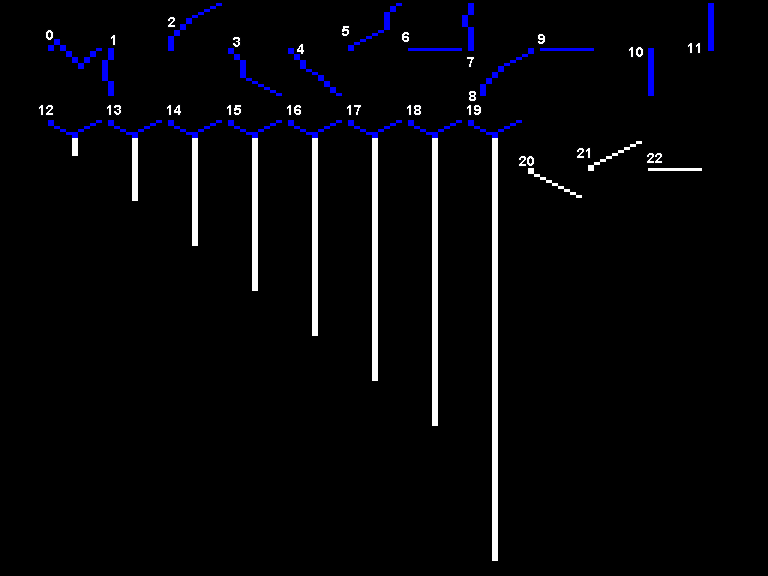
    Nobody’s Shooting At Anything

    This is a scene depicting an intense battle between Autobots and Decepticons yet nobody’s shooting at anything in particular.

    Here I’ve traced the firing lines going from the bots closest to the foreground.

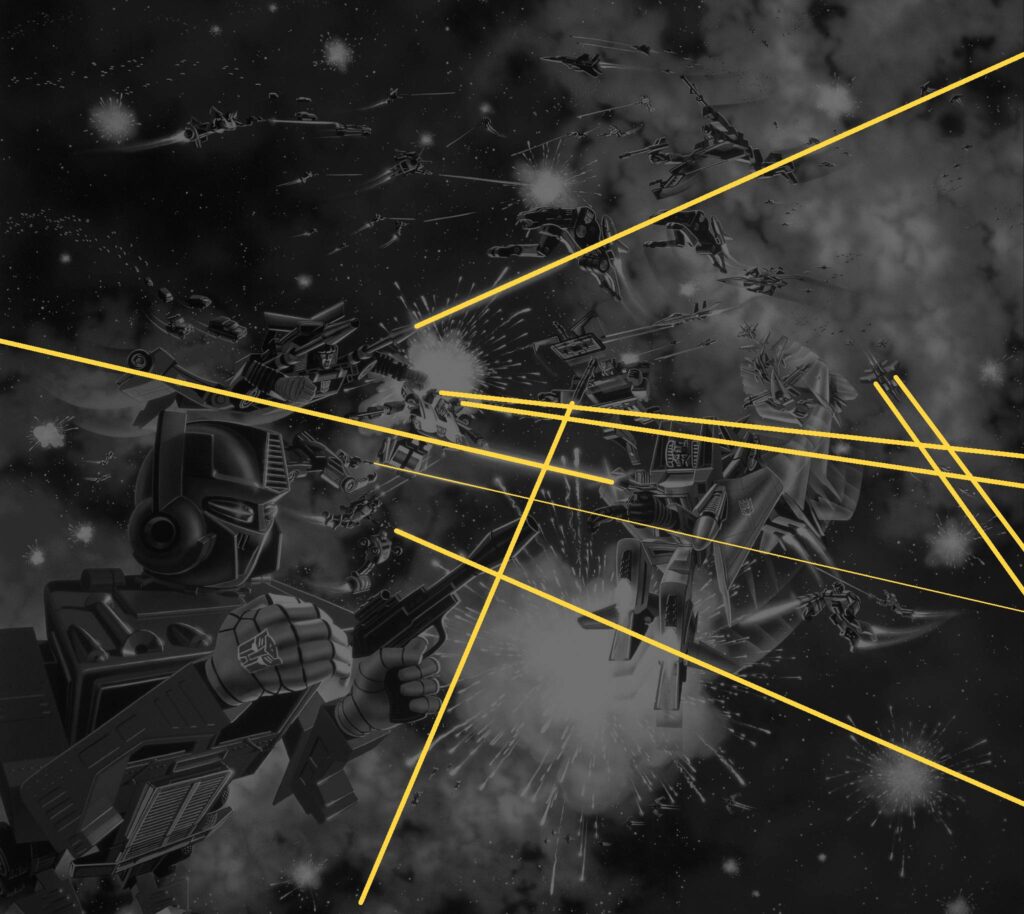
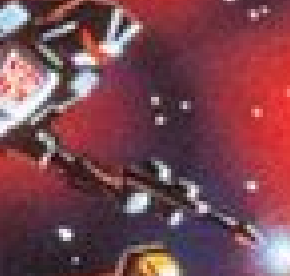
    Are all the immediate threats past the edges of the image? Is everybody near sighted? Optimus seems unconcerned about Starscream firing in his general direction.

    Maybe that’s because Starscream’s pistol shoots crooked.

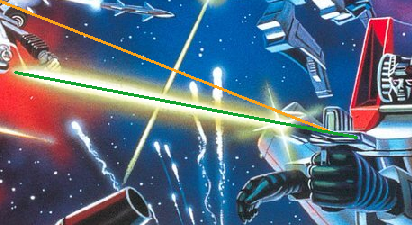
    (orange follows the gun barrel, green follows the laser beam)

    But there are explosions going on so obviously something is getting hit. Lucky shots? Bots colliding into each other because they’re just wildly flying around half-blind? Someone just loves fireworks?

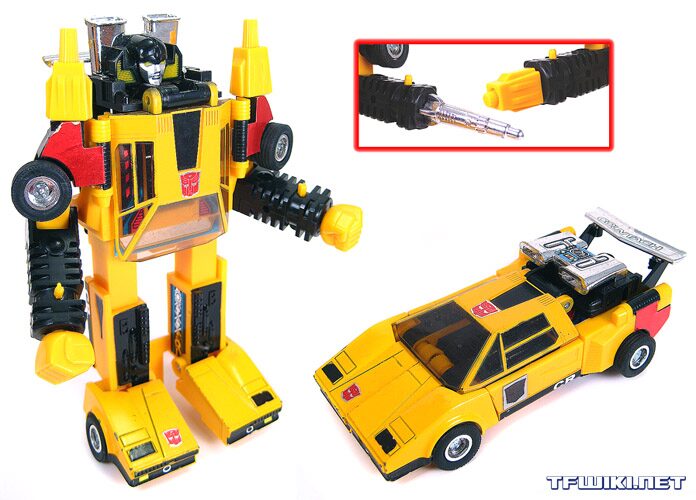
    They’re Almost, But Not Quite, Drawn Relatively Accurate to the Toys

    Aside from a few artistic flourishes (giant frigging heads and critical lack of hips) the toys are depicted pretty accurately. So accurate, Jazz is painted with his feet mis-transformed.

    https://tfwiki.net/mediawiki/images2/d/d9/G1_Jazz_toy.jpg

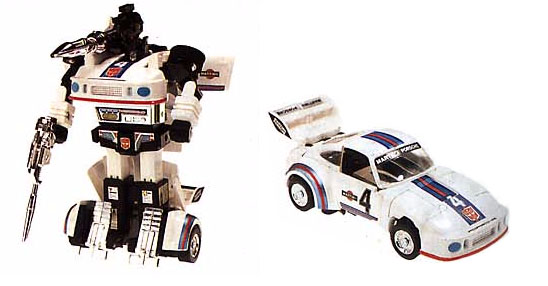
    His leggy footy flappy flaps are down. No idea where he got his horn face, though.

    However I do like how Sunstreaker was rendered, even if he’s a bit less toy accurate. They kept the wheel armpits which makes his Superman flying pose look like his arms are broken.

    For some reason the his car roof goes all the way down to his knees.

    Even the toy didn’t have it that low, merely wearing it like an untucked shirt.

    https://tfwiki.net/wiki/File:G1-toy_Sunstreaker.jpg

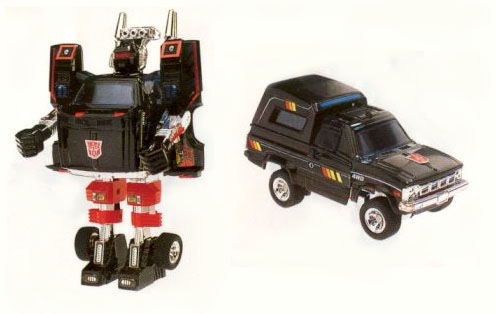
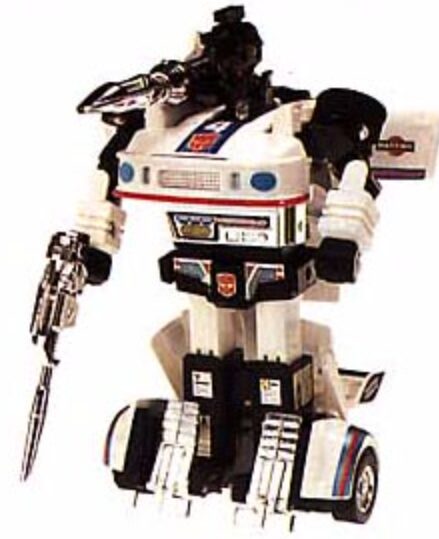
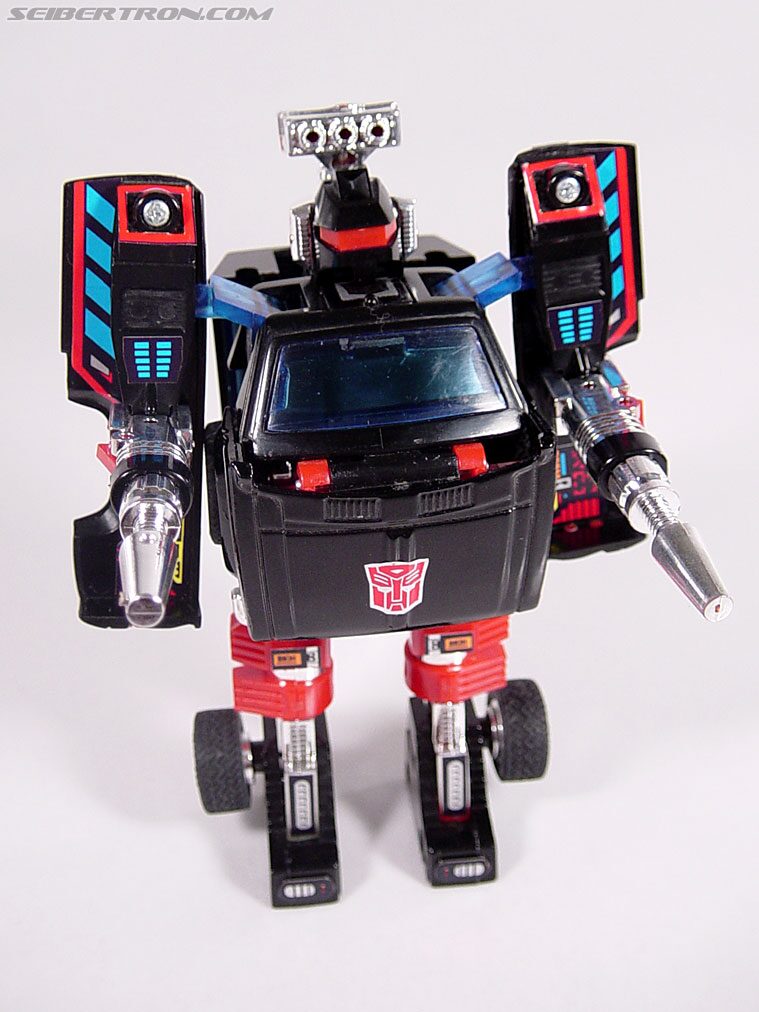
    Trailbreaker’s truck mode looks correct-ish

    but somehow his robot mode got flattened and his body is the entire length of the cab.

    Does he have wheels on his wrists or are his arms really that thin and puny?

    https://tfwiki.net/mediawiki/images2/6/68/G1Trailbreaker_toy.jpg

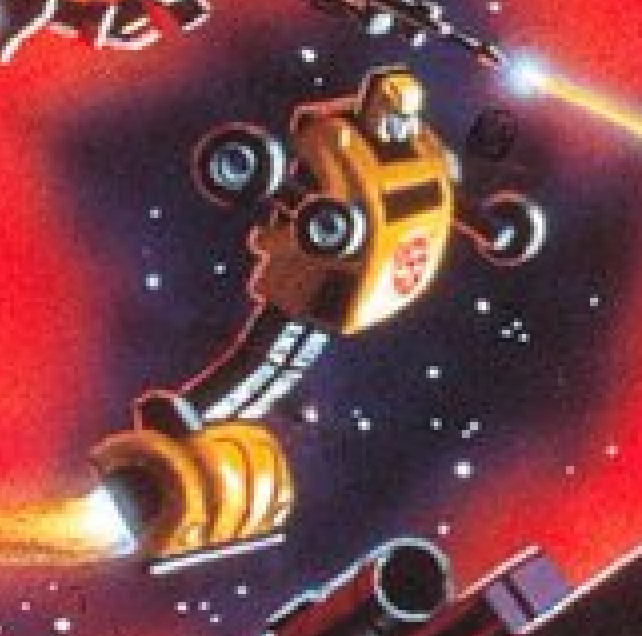
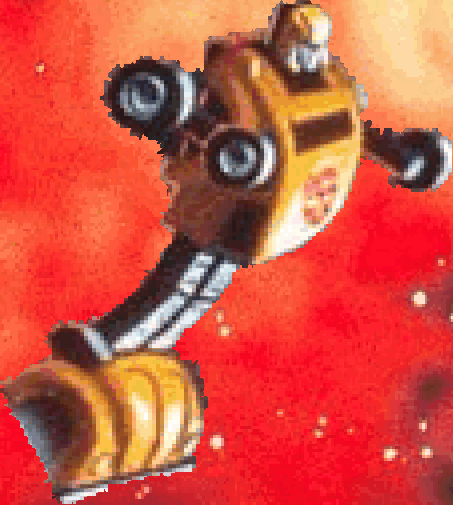
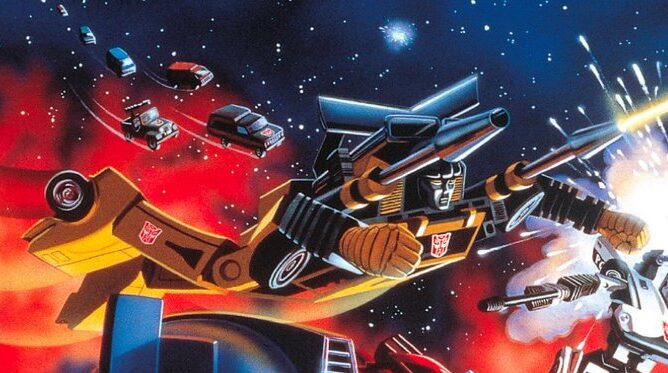
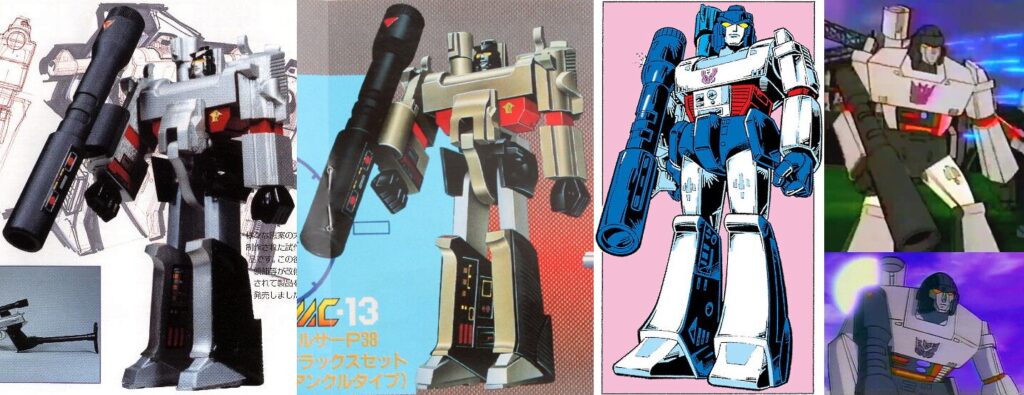
    Megatron seems based on the original Japanese prototype design, but even more simplified with a shorter fusion cannon and no back gun barrel. The color scheme is much bluer but that might be just the “lighting” of the scene. I wonder how early the art was done compared to when the toyline was finalized.

    Very early designs of Megatron

    https://tfwiki.net/wiki/File:Earlymegatron.jpg

    Of course we’re completely ignoring the fact that Megatron, the baddest of the bad guys isn’t even front and center on the image.

    “Hi guys! I’m over here if you need me!”

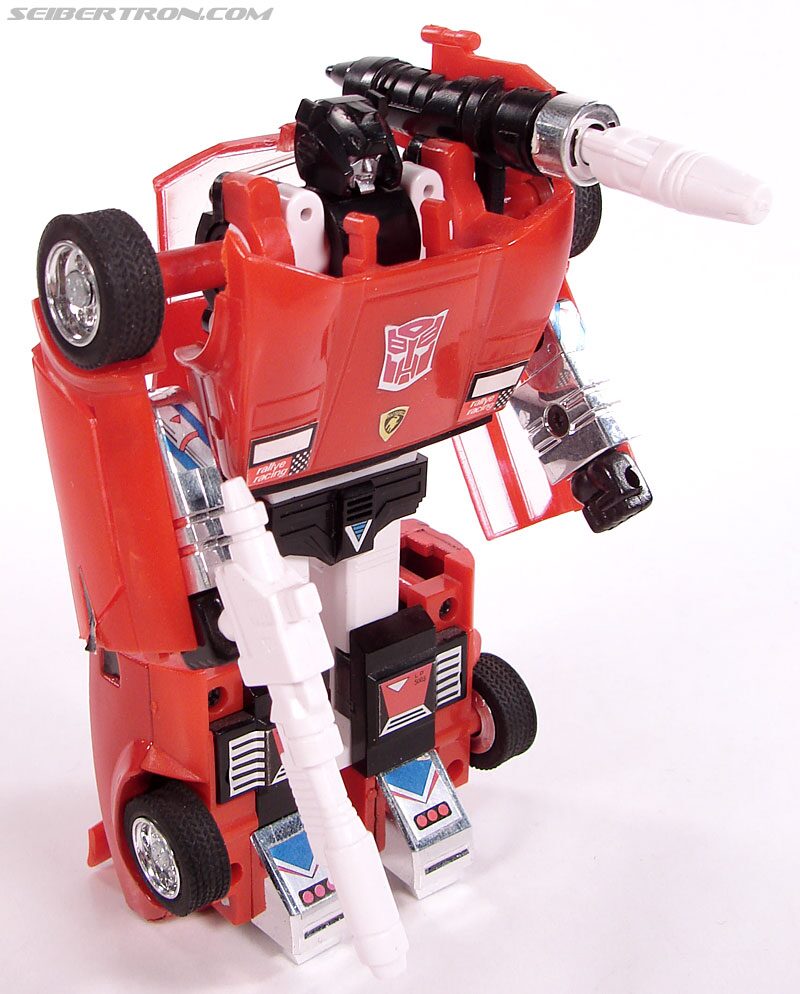
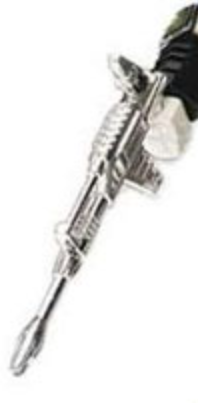
    But The Weapons Are All Wrong

    While the figures themselves look relatively accurate to their toys, barely anybody’s weapons look like their actual accessories. Maybe they were unavailable at the time?

    Reworking the shoulder cannons on Sunstreaker’s shoulders is pretty cool, actually. That should’ve become (ahem) canon.

    For everything else, however, it’s very odd. The original toys have cool-ass chrome armaments but here they’re replaced with very generic looking guns.

    Ah yes, everybody remembers Starscream’s iconic laser pistol.

    Sideswipe and Jazz came to the party underdressed. Having a big honkin’ shoulder missile launcher might help in a space battle, you know. Just sayin’.

    Maybe both of Prime’s Ion Cannons were in the shop?

    Cylinders are too boring so Soundwave’s shoulder cannon needed sprucing up.

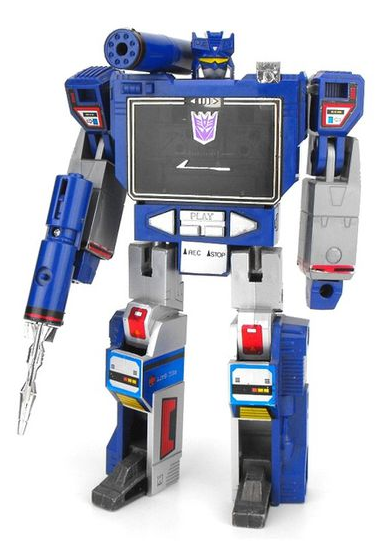
    The guns don’t seem to weigh very much, Soundwave going akimbo here with ease. One gun looks suspiciously inspired by Laserbeak, the other looks like he put the missile backwards.

    Prowl’s got an axe? A microphone? Whatever it is, it’s coming out of his knuckles. It doesn’t hold a candle to the original sleek design.

    Trailbreaker doesn’t need guns when his original toy can throw down missile hands.

    And finally, I can abide clones but not copy cats.

    I can understand that there was a time when the Transformers fiction wasn’t developed yet so I can easily accept marketing coming up with a scenario where thousands of clones are locked in a giant space battle. It’s for the box art, they want to convince kids to buy the toy, and the rule of cool applies. It’s evident that there was a ton of work put into the piece to make every robot unique, even in the far background. So it’s kinda odd seeing a slightly resized copy of a character right next to itself.

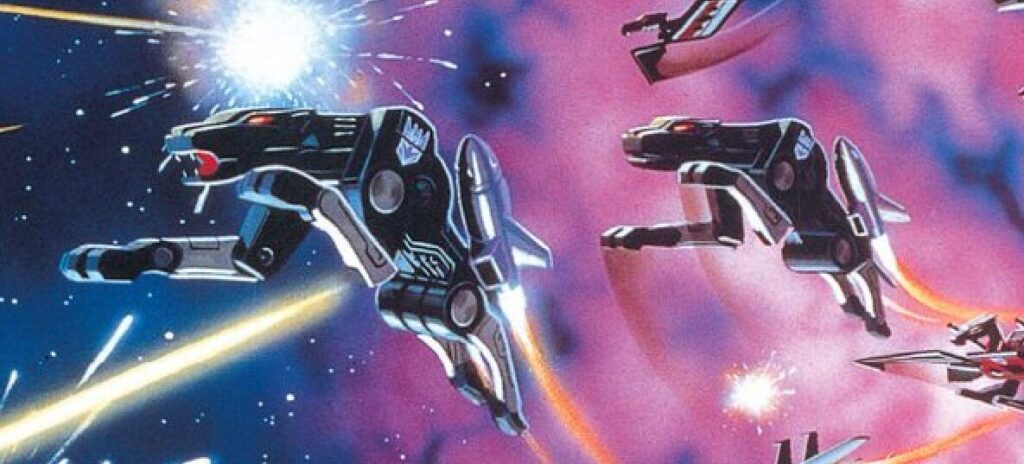
    In universe I like to think the Ravage on the right is in over his head and is just freaking out, not having any idea what to do. So he just mimics the closest guy next to him. Ravage on the left seems to have a good grasp of the fundamentals: a) bare sharp teeth b) hold a pounce pose, and c) kill Autobots.

    If ever I suddenly found myself as a flying cassette cat in the middle of a robot space war I’d follow that guy too.

  • Downland Unearthed #7: Background Collisions

    This article is part of a series exploring the reverse engineered inner workings of Downland, a game for the Tandy Color Computer, released in 1983, written by Michael Aichlmayr.

    The moving objects in the world of Downland need to know the limits of where they can go. They can’t pass through walls and they can’t fall through floors. The game therefore needs a method to detect whether an object can move through space or is stopped by the chamber’s terrain. And because chambers are made out of irregular shapes, the method can’t use a simple grid as seen in tile-based games.

    What Downland uses is a method that detects per-pixel accurate collisions which, while memory hungry, provides the player with fun platforming tricks.

    Mr. Clean

    When the game draws its graphics, it does it into a frame buffer, a region of the Color Computer’s memory. The computer hardware displays this area as pixels on the screen. To achieve pixel perfect collisions, the game uses a second buffer, which I call the “clean buffer”, which contains a copy of the chamber’s background graphics.

    Game’s frame buffer is on the left, the clean buffer is on the right.

    The clean buffer is created when the player enters a chamber. First, the game draws the background to the clean buffer. Then a screen wipe transition effect copies the clean buffer to the frame buffer line by line.

    Bzzzzzuzuuzzzut

    After that, all drawing is done on the framebuffer, leaving the clean buffer intact for the game to use.

    Memory Use

    The frame and clean buffers are unfortunately not free. Both buffers, because of their 256 * 192 one bit resolution, take up 6144 bytes each in memory. This means that only Color Computers with a minimum of 16k of memory can play the game.

    Collision Fundamentals

    We’ve seen that internally Downland’s graphics are actually 1 bit and look like this:

    I’m actually blue!

    The same bit patterns that appear blue on screen are used as barriers like walls and floors. Blue pixels have a bit pattern of [0, 1]. To detect collisions when an object is moving, the game reads the pixels around it on the clean buffer. If the pixels at a certain spot are blue, matching its [0, 1] bit pattern, then a collision is detected and the object reacts. The spots checked depend on the type of object and the type of motion.

    Let’s go through the different game objects and where they detect collisions.

    Drops

    Drops when falling check for floor collisions every update. Using a pixel mask, it checks the four pixels underneath. And because it drops two pixels per frame on the Y axis, it performs another check one pixel lower.

    If the drop detects the floor, the drop manager resets the drop into wiggle state and chooses a new random location.

    Ball

    The ball performs two collision checks, one for vertical movement and one for horizontal.

    For falling, the game checks for the two pixels underneath the bottom of the ball. It doesn’t need to check any pixels below that like drops because the ball doesn’t fall faster than one pixel per frame.

    For walls, the game checks a line across the center of the ball.

    The Player

    For collisions with the ground, the game checks below the player sprite right in the middle. The check is in the same spot no matter how the player is facing.

    For wall checks, it uses the same ground detection area, except one pixel higher. This is used for stopping against walls when running and bouncing off walls when jumping.

    Showing The Ropes

    The player has one final check for detecting ropes. Notice that it’s offset to the left, meaning jumping left towards a rope will grab it faster than jumping towards the right.

    Fun Fact! When I was a kid I was sure you had to hold up on the joystick just as you reached the rope, otherwise you jumped through it and fell to your death. I only learned much later in life that the player actually automatically grabs the rope. Had I known that then it would’ve saved me pain playing with those horrible, horrible Tandy joysticks.

    Rope Quirks

    The interesting thing about the rope detection is that it only checks whether it touches white pixels on the clean buffer. It doesn’t matter if the pixels are from a vertical or horizontal rope.

    Horizontal Ropes

    For horizontal rope traversal, the game relies on the fact that if you press and hold left or right while in a climbing state, the player will hang off the side and then fall off.

    In the code, shimmying across a horizontal rope is actually the player repeatedly grabbing a rope, moving to the side, falling off, and then re-grabbing before gravity starts to affect the player’s vertical position.

    I thought this was a pretty clever way to introduce a fun traversal mechanism with existing functionality.

    More Rope Quirks (last time I swear)

    When the game draws objects, it blends pixels together. So overlapping the player over objects and the background appears like so:

    Pixelicious!

    This actually also happens with ropes:

    To prevent this, the game erases the rope behind the player, so that the sprite appears correctly.

    But it only erases the rope when the player is in the climb state. You can see the player and rope blending together when jumping on or off.

    Fun With Collisions

    Something you don’t see often with games of the era, Downland’s per-pixel collision detection lets the player jump at a wall and land on a ledge:

    This is really fun to do and is actually a technique that the player needs to master because in chamber 5 there is a key needs to be picked up this way.

    It also lets the player bypass obstacles, like in chamber 3 where they can avoid the tricky rope jumps by just jumping across on the rock.

    Porting Considerations

    The large memory requirements of the frame and clean buffers made porting Downland on certain retro consoles an interesting challenge. While platforms like the Sega Genesis, 32X, Saturn, and Dreamcast have enough memory to hold both the frame and clean buffers in memory, older platforms like the Sega Master System, SG-1000, ColecoVision, and NES do not. The ports to those older platforms had to eschew the frame buffer, which was also used for object collision detection, and use pre-drawn clean buffers stored in ROM. These pre-drawn clean buffers take up significant ROM space (12 screens at 6k each). At the price ROMs cost back in the early 1980’s I don’t think a version of the game on those platforms would’ve been viable.

    Side note: The Sega Master System port of Downland stores the clean buffers in ROM, but it turns out it doesn’t have to. The console has 8k of memory. The original port I did used over 2k of ram for game variables, not leaving enough space for a clean buffer. The rom wound up to be 128k in size. However, the SG-1000 port I did after heavily optimized memory usage and dropped it to less than 1k.. So if I wanted to, I could revisit the SMS version to use a clean buffer, removing the need to store all the per-room clean buffers in ROM, making the game smaller. But I’m lazy so who knows if ever that’ll happen!

    Next Time

    And that’s it for background collisions. While memory hungry, it provides some fun and unique gameplay features. Next time we’ll look at how the frame and clean buffers are used for player-object collisions.

  • RE’ing Kung Fu for NES, Part 2

    Just slowly plugging along. I’ve been alternating between trying to understand snippets of code in Ghidra, looking at memory changes at runtime in Mesen, changing them to see what they do, and tracing execution paths in the debugger.

    That’s probably the cycle I’ll be doing all the way through.

    I can’t debug through Ghidra but it’s got extensive commenting/renaming features. Mesen’s debugger has a few label creation/renaming features but it’s a more limited. I don’t seem to be able to add comments, which would’ve been nice. The debugging features are pretty great, though.

    One thing I haven’t seen in Mesen is a feature to track whether certain values went up or down between breaks. It only marks values that have been written to. It would help pinpoint memory values that go down, like health bars or time counters.

    So far in memory I’ve identified some various timers, the random number generator, player lives and progression, joystick/oam/ppu register copies. I’ve also found update functions for what I guess are the different “modes”, like the title screen and game play, with each mode having multiple functions, which are maybe sub-modes. Haven’t gone too deeply into it yet. Identified a few simple utility get/set/clear functions for memory and PPU.

    I realized I could look at Game Genie codes to help figure out certain values. There aren’t that many codes out there but it did identify a few things.

    Moved the project file to the cloud to at least have some semblance of backup and version control. I’ll have to figure out how I want to store this in GitHub or something.

  • Downland Unearthed #6: Boulder Ball Bat Bird

    This article is part of a series exploring the reverse engineered inner workings of Downland, a game for the Tandy Color Computer, released in 1983, written by Michael Aichlmayr.

    Look at them rainbow colors! I am an artiste!

    Downland has a very barren ecosystem. Other than the unrelenting acid drops of death there are two other beings roaming and lurking in the depths of the game’s chambers: the ball and the bird.

    The Ball Boulder

    In Downland the main active enemy you face other than the drops is what I call the ball, even though it’s probably a boulder. You know, a boulder that squashes and stretches when it bounces across the screen.

    I can only guess at its inspiration. Was it inspired by Indiana Jones: Raiders of the Lost Ark’s rolling boulder scene? I thought maybe it was inspired from the bouncing springs in Donkey Kong’s elevator level, but an email from Mr. Aichlmayr’s disproves this.

    In any case, in the reverse engineered assembly code and the C version I call it the ball. It’s the name that came to most naturally to me. I told myself I can name it anything I wanted as long as it’s consistent. I could’ve named it Jennifer.

    Every Day The Same Again

    The first thing that struck me about the ball behavior is that no matter what room it appears in, it always spawns in the exact same spot. It spawns at X=101 and Y=116 in logical game space, appearing at X=202 in screen space. I never realized this playing the game, even after all these years. Props to Mr. Aichlmayr for making the chambers’ geometry varied enough to mask that fact.

    Do The Locomotion

    The ball’s position uses 16 bit fixed point values. Eight bits are for the integer part and the other eight bits are the fractional part. The ball moves along the X axis 88 fractional units to the left. In comparison, the player moves 56 fractional units. The player is constantly getting mowed down by the ball. And even if the player manages to dodge it, its repeating nature just means they’ll only have a few seconds before it comes back.

    When the ball is falling its speed is increased by 18 fractional units every frame with a maximum speed of 256. When it hits the ground, it sticks to it for 4 frames (showing the squished animation frame), then bounces back up with a speed of -256 and a gravity of 10. When bouncing up, it counts 10 frames and then sets the vertical speed to 0, letting the falling gravity take effect again. This gives the effect of the ball falling faster than going up, squishing hard on the ground.

    When part of the ball overlaps a blue pixel on the background, it restarts. Here I changed the rope color to blue.

    When it collides with the terrain, the ball resets its XY position, but doesn’t reset its vertical and horizontal speeds. This has the effect of changing the ball’s trajectory as it can be in the middle of jumping up or falling down. This makes it so the player can sometimes find temporary safe spots in certain chambers, like here on the bottom stairs in chamber two:

    On every other cycle, the ball bounces clear over the player, providing a brief respite.

    Room With a View Ball

    In theory the ball can be used in any chamber. The only thing that limits this is a table that specifies which chamber it appears in. The table contains these values:

    roomsWithBouncingBall[10] = 0, 2, 5, 6, 10, 11, 12, 13, 14, 0xff

    When the chamber initializes, it goes through the values of the table to find the current chamber number. If the current chamber’s number is found, then the ball is spawned. If it’s not, it reaches 0xff and skips the ball initialization.

    Cut Content?

    The most fascinating thing about the table above is the set of values 10, 11, 12, 13, 14. As the values are chamber numbers, could this be evidence of cut chambers? Did at one time the game contain five more chambers? Or are these just place holder values? We’ll likely never know. As far as I can tell, this is the only existence of unused data I’ve found in the whole ROM. It’s fun to think about what they could’ve looked like if they had existed.

    It’s a Bird, It’s a Bat. It’s Bat Bird.

    Drops are random but easily avoidable. The ball is hard to dodge but predictable. When the chamber’s timer hits zero, however, all hell breaks loose. The bouncy zigzagging winged terror of doom is unleashed. Don’t let its simple bird-like appearance fool you. If you see it and you’re not anywhere near a door, consider yourself dead in advance.

    Your worst nightmare

    Like the ball, no matter which chamber, the bird always spawns at the same spot. It starts at X=35 and Y=26. It has a base X and Y speed of 256 fractional units and then a random speed between 0 and 255 is added on each axis. That means it’ll always spawn going down and to the right but at different angles.

    Unlike the ball, the bird doesn’t try to detect the chamber’s terrain. It just flies straight in a direction until it hits an invisible wall and then reflects off. The walls are defined by a bounding box with screen coordinates (14, 16) for the top left and (240, 177) for the bottom right.

    It continues to bounce around until you change rooms or die. If you die for any reason, the bird disappears and the timer is reset to 2048, giving you a little more time to escape.

    Next Time

    With all these hazards going around, I haven’t yet explained how the game detects collisions between them and the player. I hope to cover that in the next installment.

  • RE’ing Kung Fu for NES

    On a whim I decided to look into reverse engineering Kung Fu, a launch title for the NES released in 1985. I was surprised there wasn’t a lot available online already.

    Ever since RE’ing Downland I was thinking about my next RE project. I wanted something I could complete in a reasonable amount of time with a reasonable amount of effort. I have huge ambitious dreams of RE’ing all my favorite games, but I have no time or patience for anything big.

    The Kung Fu ROM is 40 kilobytes, 8kb of program and 32kb of graphics rom. I think that’s pretty much what I can realistically tackle.
    (Correction: It’s actually 32kb of program ROM and 8k of graphics ROM. The people responsible have been sacked.)

    I did find a YouTube video series by DandyLo about KungFu’s inner workings, including one about how it handles collisions.

    One thing I’ve already found that surprised me is that the main player character is made out of background tiles, not sprites. If the game already uses sprite 0 to do the split screen, I wonder how it scrolls the middle part of the screen to move the player around.

    I got a Ghidra project up and started the preliminary investigation. I’m also using Mesen and its debugging features. I’m not very far in. I’m at the point where it sets up RAM, the PPU, and namespaces and then goes into an infinite loop. After that I guess it handles everything through the vblank handler.

    I’ve barely gotten off the ground but I’ll want to post up the work somewhere. I don’t actually know if I can post Ghidra projects on Github. At the very least I’ll post a disassembly listing.

    I plan to interleave this work with other projects. I still have maybe a few more Downland Unearthed articles in me, and I’ll want to eventually tackle scrolling of really large areas in SMS Rally. The idea is that instead of intensely concentrating on just one project (and potentially burning out, again) switching between different ones will keep my interest and energy up. We’ll see!

  • SMS Experiment, Day 18

    Since the last update, I’ve tried coming up with solutions on how to fix the glitchy sprite tiles when changing direction. The problem stems from me trying to copy too many tiles to VDP memory during vblank. The VDP tries to render the graphics while I’m still trying to copy memory and that causes conflicts. The friendly smspower folks suggested a “double buffered” solution where I’d copy the car’s tiles over two game frames. Copy half-ish of the car’s tiles on the first frame, then the rest on the second frame. When copying, put the tiles into a “back buffer”, i.e. an unused area of VDP memory while the active sprites use a different area. When the copy is done, make the sprite use the newly copied area and then next frame copy the tiles into the “old” area.

    Went with an ugly but working solution. In the gif above you can see the two areas in the VDP memory getting updated in alternate steps.

    The disadvantage of updating over two frames is that the animation will be updated at 30fps while the rest of the game runs at 60fps. But the physics can still run at 60fps and the new direction even if the sprite doesn’t reflect it exactly for one frame.

    Now that I think the prototype is in a decent working shape, I do believe I’ll be taking a break on this project for a bit.

  • Downland Unearthed #5: Backgrounds

    This article is part of a series exploring the reverse engineered inner workings of Downland, a game for the Tandy Color Computer, released in 1983, written by Michael Aichlmayr.

    Generating Downland’s backgrounds is easily the most complex part of the game’s code. It doesn’t store its backgrounds as tiles organized on a tile map like on a console, nor does it store the background as an image. In actuality, its backgrounds are built from a string of pre-defined shapes drawn end-to-end by a virtual plotter.

    Shapes

    Downland uses twenty-two different shapes to achieve its background layouts.

    Since the original assembly doesn’t have any names for the shapes, here are the names I gave them in the C version.

    Regular shapes

    0 Stalactite
    1 WallGoingDown
    2 LeftHandCornerPiece
    3 TopRightHandCornerPiece
    4 TopRightHandCornerPiece2
    5 BottomRightSideOfFloatingPlatforms
    6 FloorPieceGoingRight
    7 WallPieceGoingUp
    8 CornerPieceGoingDownLef
    9 FloorPieceGoingLeft
    10 ShortLineGoingDown
    11 ShortLineGoingUp

    Vertical ropes

    12 VeryShortRope
    13 ShortRope
    14 MidLengthRope
    15 LongRope
    16 VeryLongRope
    17 SuperLongRope
    18 ExcessivelyLongRope
    19 RediculouslyLongRope

    Horiziontal ropes

    20 Horizontal RopeStartGoingRight
    21 Horizontal RopeEndGoingRight
    22 Horizontal RopeGoingRight

    Parts & Segments

    Shapes are made up from one or more smaller parts. And each part is made up of one or more segments. Each segment is a line with a direction and length. Most shapes are made up of just one part but the ropes are made out of multiple.

    Here is a breakdown of the Stalactite shape.

    The Stalactite is made out of one part, and that part is made out of three segments. Segments start from the previous segment’s ending position and so their start and end points overlap.

    And here is a break down of the ShortRope shape.

    The ShortRope, like all the rope shapes, is made out of three parts (A, B, C). Parts A and C are made up of one segment each while part B is made out of two.

    Harry Plotter

    The shapes are defined as a series of segments because the backgrounds are drawn using a plotter-like system. From a starting point the plotter goes through the segments of each shape, drawing into a buffer one line at a time. This is similar to how old arcade games like Asteroids and Tempest draw vectors to a CRT display.

    Plotter Colors & Hidden Links

    The plotter can be configured to draw blue, white, or black lines. Black lines are used to give the illusion of floating platforms or sub-rooms. Below are images of chambers with their hidden lines revealed in white.

    Part Data

    This is what the data for the Stalactite’s one and only part looks like. Each segment is made up of movements along the X and Y axes plus an orientation. The orientation determines which is the major axis between the two.

    Shape Data

    There’s no actual data that defines a shape. Each shape has a function that instructs the plotter which parts to draw and how to draw them.

    Segment Drawing

    Drawing a segment to the screen works similarly to sprite drawing wherein the data assumes a 128×192 resolution but the actual drawing is done in 256×192.

    The segment is drawn with white double-wide pixels but a CRT mask is applied on top that makes it appear blue. Ropes are drawn without the CRT mask to appear fully white. No background shapes use orange.

    Putting It All Together

    Please enjoy this video of all the chambers being drawn one shape at a time.

  • SMS Experiment, Days 14 & 15

    Worked on importing the sprite graphics into the game prototype. Reused a lot of the animation/drawing code from my old Ninja Girl project.

    Once the graphics were imported, started on the actual driving around. It doesn’t feel like 16 directions is smooth enough. Rom space isn’t an issue so I can definitely try 32 directions.

    I don’t understand the sprite glitching at certain angles. I’ll have to investigate. Tomorrow, maybe.

    I’m easily hitting the map scrolling limits, which is expected. For racing to happen, tracks will have to be pretty long. I still haven’t thought about how I’ll pull that off. I want actual twists and turns, not like Enduro Racer where it just scrolls in one diagonal direction.

    Programmer art rendition:

    More pondering is needed.

  • SMS Experiment, Day 13

    Finished drawing the basic sixteen directions for the car. I put them all together in a rotating animation and it… doesn’t look that great.

    The car looks inconsistent from frame to frame which is wonderful. The car changes size and height. When I started was drawing the sprites by eyeballing them against the prerendered car but at the end I just started drawing overtop them.

    But version 1 is done so now I can start working on code. But I think a version 2 will be in order once I get some gameplay going. Next time I’ll stick much closer to the prerendered version.

  • Downland Unearthed #4: Shifted Sprites

    This article is part of a series exploring the reverse engineered inner workings of Downland, a game for the Tandy Color Computer, released in 1983, written by Michael Aichlmayr.

    In the previous post I talked about how Downland’s 1-bit graphics are setup to take advantage of CRT artifacts to generate colors. In this article I talk about how Downland draws its sprites to the screen.

    Sprite Hardware? What Sprite Hardware?

    The Tandy Color Computer doesn’t have built-in sprite hardware like the Atari 400 or the Commodore 64, where the programmer can just set a few registers and sprites are conveniently placed on the screen. For the CoCo, drawing sprites requires directly manipulating the memory that is used for the screen.

    Screen Memory

    What the player sees as graphics is represented by a specific region in the CoCo’s RAM. Turning on bits in that region of memory will activate the corresponding pixels on the screen.

    Writer’s Block

    One problem with working with Downland’s 1-bit graphics is that you can’t directly address the bit/pixel you want to turn on. 8-bit CPUs like the Tandy Color Computer’s 6809 can only write to memory one byte (eight bits) at a time at the minimum. They can’t write individual bits. So for any changes you want to make to screen memory you have to do it in bytes.

    Another limitation is you can’t write that byte anywhere. It has to be written along byte boundaries. This means you can only write a byte at every eight bits (0, 8, 16, etc). You can’t write a byte at bit 3 and expect it to change bits 3 to 10.

    Sprite Basics

    Because the screen is 1-bit, Downland’s sprites are naturally 1-bit as well, as seen on the player sprite below. Each frame of the player sprite is 16 pixels wide and 16 pixels tall. As the graphics are 1-bit, the 16 pixels for each row of the sprite take two bytes. The first byte of each row contains the front of the player sprite while the second byte contains the back.

    8-Bit Drawing Limitations

    Because the CPU can only write 8 bits at a time, if you wanted to draw the sprite as-is to the screen you could only do it on byte boundaries. The result is the sprites appear at every 8th pixel on the screen horizontally.

    Note that the sprite can be placed anywhere vertically. There’s no limit there.

    Still, this is obviously very limiting for a platforming game like Downland which has objects going across the screen.

    Shifted Sprites

    The trick Downland uses to draw sprites along the horizontal axis is by copying the original sprite and creating new versions that are shifted to the right by a certain number of bits. These are called shifted sprites or bit-shifted sprites.

    Things to note:

    • In the game the sprites are shifted by two bits (aka pixels) instead of one because while the screen resolution is 256 pixels across, the game logic is actually half at 128. So for every X position in the game’s coordinate system, objects are drawn at twice that. Therefore it only needs shifted sprites for even-numbered positions.
    • It also shifts by two bits to maintain the CRT artifacting effect.
    • Because we only need shifted sprites for the even positions along the byte, only four shifted sprites are needed for each sprite.
    • Shifted sprites go past the second byte so they now need take up three bytes for every row.
    • There’s no version of the sprite for being shifted by 8 bits or more because at that moment you can just use the first shifted sprite again. It wraps around.

    Drawing Shifted Sprites

    The game uses the sprite’s X position to determine which shifted sprite to draw. The game takes the lower two bits of the object’s X position, which gives a value that goes from 0 to 3. It uses that value to look up which shifted sprite to draw. Zero uses the first shifted sprite, 1 uses the second, 2 uses the third, and 3 uses the fourth.

    The image below shows bit shifted sprites being drawn on screen with different X values.

    Memory Usage

    Shifted sprites are generated when the game is turned on and are stored in memory.

    As there are four shifted versions of every sprite of every object, it can take up a fair bit of memory. For example, the player’s ten frames of animation take up:

    10 frames x
    4 shifted versions x
    3 bytes per row x
    16 rows:
    1920 bytes

    With the game taking 6k bytes for the screen, and another 6k for a clean version of the background, it really starts to impact the 16k of the original Tandy Color Computer. But everything fits.

    Which Sprites?

    Shifted sprites are generated for the player, the ball, and the bird sprites. The ball and bird sprites each have two frames of animation.

    Exceptions

    The drops, the splat sprite, and the door have their own particularities when it comes to drawing them shifted.

    The drops are actually pre-shifted in the ROM, as seen here:

    Side thought: I wonder if the drops were the sprites Mr. Aichlmayr made first and then immediately realized that storing shifted versions of all the other game objects was going to take a lot of ROM space and changed strategy. Or the change in strategy came at the end of development trying to reduce the game’s final ROM size.

    For the splat sprite, it’s the only one in the game that’s 24 pixels wide.

    Unlike the other sprites above, where the shifted versions are pre-drawn, drawing the shifted splat sprite is done on the fly. When the player gets squashed the splat sprite is drawn shifted into a temporary offscreen buffer. The buffer is 32 bits (4 bytes) wide so that the shifted sprite can fit. Then the offscreen buffer containing the shifted splat sprite is drawn to the screen.

    Fun fact: the splat has a two frame animation when the player dies but there’s no second frame stored anywhere in rom. To achieve the animation, the splat sprite is first drawn to the screen and some time later the top part is erased directly from the screen’s memory.

    The door is also drawn on the fly, using the same technique as the splat sprite.

    It’s drawn when a door gets activated and also as part of the background drawing when the player enters a chamber.

    Pickups

    Finally, the game treasures (key, diamond, money bag) are the simplest drawn objects in the game. They don’t use shifted sprites at all as they’re always drawn at a multiple of 8 pixels.

    Wrapping Up

    Lacking dedicated hardware support, shifted sprites is a commonly used technique for Tandy Color Computer games to draw objects on the screen. It lets sprites to be placed anywhere on the horizontal axis at the expense of memory. Downland uses the technique in various ways to draw its game objects. In the next article, I’ll talk about how the background graphics are drawn.

About Me

Retro game dev, Sega, Downland.

Socials

Bluesky

Twitter/X

Downland Unearthed Articles

Super Fun Comic Strips!

Projects

Downland_RE, a reverse engineering of the Tandy Color Computer game from 1983, buildable to a byte-for-byte reproduction of the original V1.1 rom.

Downland_C, a translation of the original Downland code to the C Programming language, and ported to many retro consoles.

basicsmsproject, a basic layout of a devkitSMS project using a makefile.

barebones32xproject, a bare bones 32X project using Chilly Willy’s 32X Toolkit based off of Victor Luchits’s Doom 32X Ressurection project.